Developing Photos With Darktable
A brief intro to Darktable in 2024
This guide is kept up-to-date with Darktable releases. It is currently written for Darktable 4.6.0, released December 2023.
Ansel Adams said “the negative is the score, and the print the performance.” Were he shooting digital today, I suspect Adams would rephrase that to: the RAW file is the score, and the print the performance.
Today’s RAW file is somewhat like a film negative. RAW files are considerably more malleable, but you get the idea. If you want more control over the final look of your photographs, you want to shoot RAW format images. These days nearly every camera can shoot RAW files — even my four-year-old phone can do it. You may have to set your camera to shoot RAW though, most are only set to capture JPGs out of the box. Look through your manual or menus until you find “image format”, which should have options for JPG and RAW. You want RAW. You can shoot in RAW and JPG if you want, but I tend to shoot just RAW.
The problem with RAW is that they are the equivalent of film negatives. You have to “develop” them. As with developing film, the process of developing a RAW file takes time and skill. When you’re first starting it can seem overwhelming, which is probably why you’re here. Don’t worry. Remember what Thoreau said, “nothing can be more useful to a man than the determination not to be hurried.” I’m sure Thoreau would say “a person” if he were writing today, but the point is, relax, take a breath, there’s no need to rush, it’ll make sense eventually.
There are several tools out there to develop RAW files, the most common is Adobe Lightroom. I used to use Lightroom, but found its tool limiting after trying Darktable, an open source RAW developer. Darktable bills itself as “a photography workflow application and raw developer… it manages your digital negatives in a database, lets you view them through a zoomable lighttable and enables you to develop raw images and enhance them.”
There are a lot of great tutorials out there on Darktable. The problem I noticed as I was learning is that tutorials go out of date, especially video tutorials. Videos show you what to do better than words can sometimes, but they’re a pain to re-shoot and keep up-to-date so hardly anyone does. When I was learning Darktable, I found it frustrating to watch good tutorials, but discover that the features described no longer worked the same way in Darktable. I am trying to avoid doing that here. Darktable is updated twice a year at the moment, so not that often, but things do change. And I find new tricks from time to time too. I will keep this guide updated to reflect both changes in Darktable and changes in my own workflow.
Okay, ready? Let’s get started.
Table of Contents
- Setting Up Darktable
- Learning Your Way Around Darktable
- Customizing Development Modules
- Example Quick Edits (Video)
Set Up Darktable
The first thing to do is download Darktable for your PC. Darktable is available for Linux, Mac, and Windows.
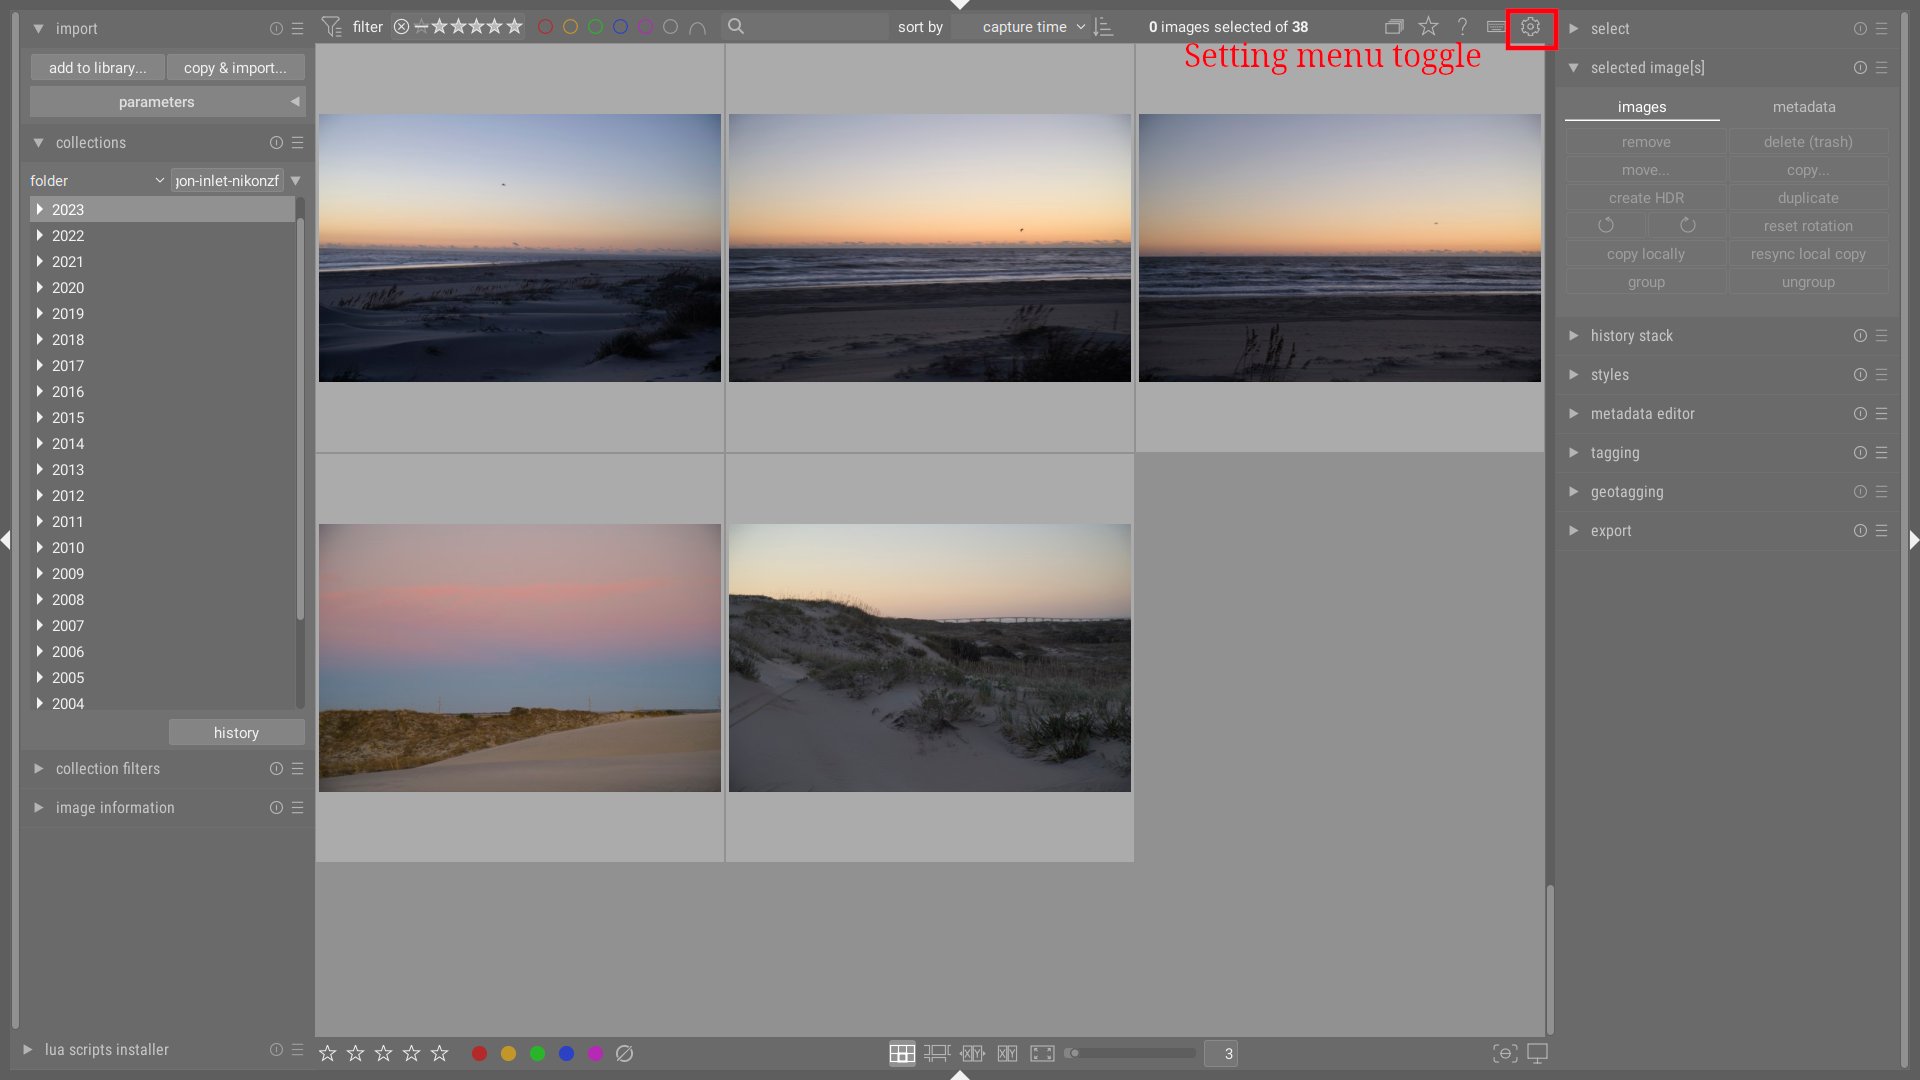
Once you have Darktable installed, open it up and you will get a blank library screen. Before you do anything else, let’s check some settings to make sure we’re all on the same page. Click the gear icon toward the top of the screen to the right side:
Click the Processing tab on the left side of the settings panel and make sure that Auto Apply Pixel Workflow defaults is set to scene-referred (filmic), like this:
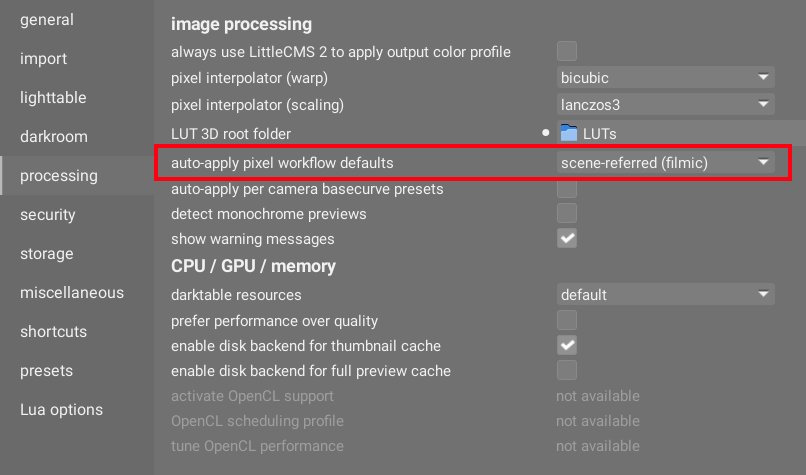
This will ensure that what’s applied by default when you import an image is the same as what’s applied to mine. This isn’t necessarily the “right” thing to use, scene-referred (sigmoid) will also work, but it won’t produce the same results as the rest of these tutorials.
We’re done with settings. Hit escape to close the settings window and save your changes. Yes, that’s weird way to do it, but that’s the way it works in Darktable (on Linux at least).
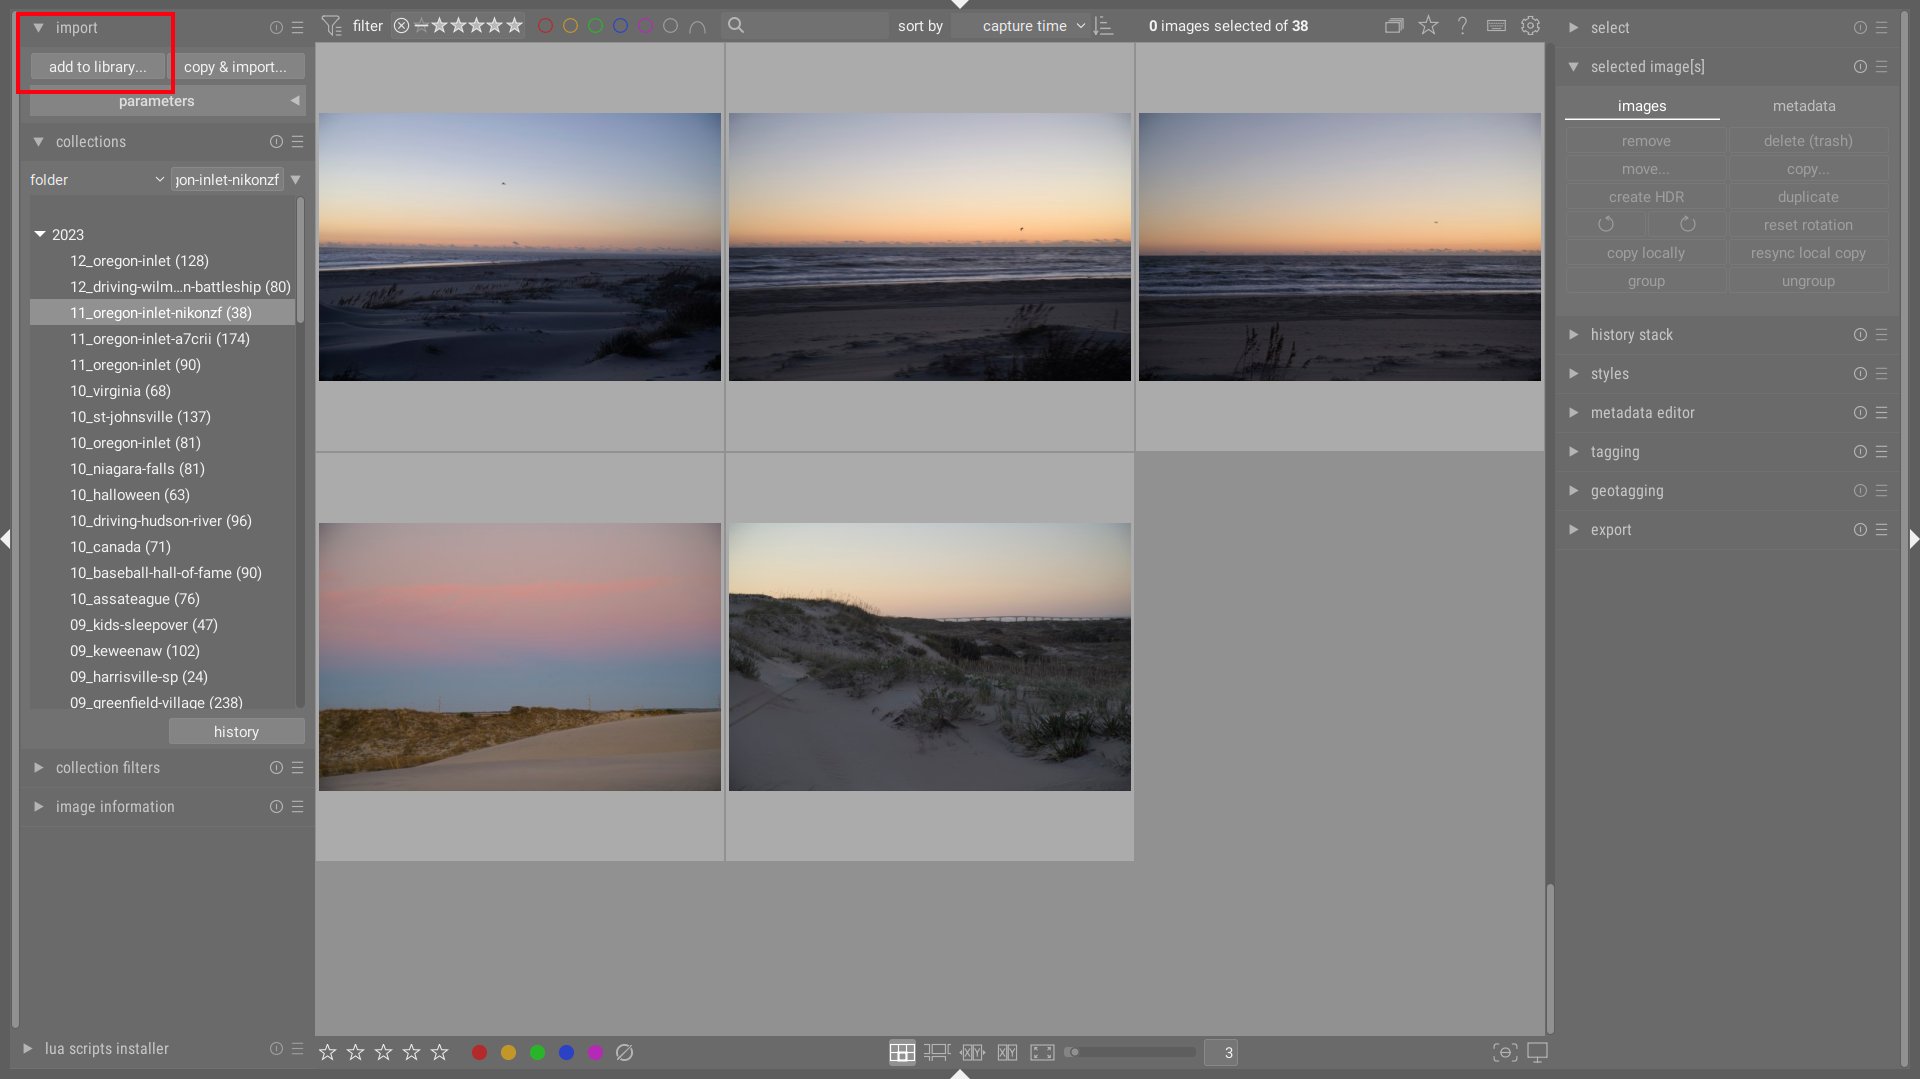
Let’s add some images to our Library view so we can explore both that and the darktable view. To do that you want to open the import module in the upper left corner of the screen and click the add to library button.
Naming and organizing your images is a topic onto itself. I am going to assume that you have a system for this and that you don’t want Darktable to move or rename images. Because you don’t, it’s tools are not the best for that.
I have a custom shell script that renames my images for me, but you can do the same thing using Rapid Photo Downloader on Linux. I’m sure MacOS and Windows have similar apps (if you have suggestions, drop a comment below and I will add them here).
When it comes to organizing images, use what works for you. What I do is use a directory structure of a folder for the year, then within that folders that start with the month number, followed by the event name. So if I took some pictures at Edisto Beach in January of 2024, those images would live in 2024/01_edisto-beach. Within that folder every image is named YYYY-MM-DD_HHMMSS_event-name.ARW. Which works out to a timestamp with the event name on the end so I can sort them by date taken in any application, including the file browser, but also know roughly what they are without opening them (thanks to the event name on the end). Anyway, this is what works for me, do what works for you.
The Darktable import images dialog has a few options worth understanding. The “select only new pictures” option is a handy option if you regularly add more images to existing folders as I do. Darktable WILL NOT automatically add new images to your database. You must go and import them manually, even if the folder is already in Darktable. If you check the “select only new pictures” option, the new images will be automatically selected when you open that folder in the import dialog.
The other option worth knowing is find new images recursively. I leave this unchecked because I never import a folder with another folder inside it, but if you do, this will tell Darktable to import all the images, no matter how many folders deep they might be buried.
Also see the relevant Darktable Manual entry for the import dialog.
Learning Your Way Around Darktable
Now that you’ve got Darktable installed and few images imported, let’s figure out what we can do.
The main view is the Lighttable. This is modeled after the old lightbox we used to put slides on then stare at with a loupe until we were half blind. Fortunately in Darktable you can just zoom in and out.
I use a laptop and rarely get out a mouse, so I prefer to navigate Darktable mostly using keyboard shortcuts. There are some good built-in shortcuts, like using d and l to switch between darkroom and lighttable views. You can do that now if you want to see Darktable’s other main view, the darkroom view which is where you actually edit images.
Switch back to Lighttable by hitting l again.
The first thing I do in Lighttable when I import new images is figure out which ones I want to spend time on and which are not worth the effort. I never throw the latter away, but I do tend to ignore them most of the time.
Darktable offers a “culling” mode to help out with the process. You can try it if you like, the shortcut is x which will change the view in put two images side-by-side so you can compare them.
I don’t use this mode, it came along after I’d already figured out a way to do the same, so I’ve continued with my method, which is more complex, but adapted to how I shoot and process images.
Like most people I almost always underexpose my digital images. It’s easier to recover shadows than highlights so this make sense in digital photography. Unfortunately it leaves me with a lot of overly dark images to compare to figure out which are worth keeping. My solution to this was to create a quick way to lighten them, primarily using keyboard shortcuts.
The shortcut I consider most essential is mapping Darktable’s Exposure module to Shift+e.
This allows me to hold down Shift-e and flick my mouse scroll wheel (or trackpad) up and down to increase and decrease exposure. I don’t have to futz with opening the Exposure module or anything else, I hit the shortcut and adjust. This saves tons of time when I’m developing images.
What I do is select the first image in the Lighttable view, hit “d” to enter darkroom mode, then I hold down shift and e and scroll up and down to adjust the exposure to a level where I can tell what’s going on in the image. When I have it where I want it, I hit shift + k to move to the next image, and then repeat the process. Using this method I can run through a batch of images in a few minutes, lightening them up so I can see what’s happening. I don’t worry about getting the perfect exposure, just light enough to be able to cull them down to the “keepers”.
If you’d like to try this — and I can’t recommend the exposure shortcut enough, nothing sped up my workflow like that one — here’s how you set it up.
Open the preferences pane again. Choose Shortcuts in the left menu and then click the little arrow to open the processing modules section and scroll down to exposure. Click the arrow next to exposure and then double-click on exposure. After you double-click, Darktable is waiting for you to define the keyboard shortcut. Hold down shift, press ‘e’ and scroll your mouse. Now look below and you should see a line like what’s in this screenshot:

If you want to move between images with the shift j/k shortcuts you’ll need to set those up too. The method is the same, the action is image back/image forward, which is under views >> darkroom. By default the shortcuts there are space (forward) and backspace (back), but I don’t like training my brain to it backspace so I went for the Vim-style j/k.
Hit escape to save and exit preferences. Yup, still weird, but now we’re used to it. Next select an image, hit d to open it in Darktable view. Test your shortcut: hold down Shift and e and scroll up and down and your image should get lighter and darker. Awesome. If not, re-read the above. It took me hours to figure this out the first time I tried to set this up, so don’t feel bad if it doesn’t work right away. Re-read the above and try again. Remember Thoreau. Don’t hurry.
Customizing Development Modules
As you saw above when we tweaked the exposure, Darktable adjustments are done in what are called modules, little tools that handle a certain type of adjustments. If you open up the actual exposure modules on the right side of the screen you’ll see that it adjusts exposure, sets a black point and handles other things related to exposure. Darktable has enough of these little modules that I am overwhelmed by the full list even after using the app for eight years. When I counted just now I came up with 64 user-adjustable modules. That’s a lot of options. Too many in fact. But you don’t have to use all of them.
Of those 64 modules I use 9 on a regular basis and another 6 occasionally. Why so many options? This is the nature of open source software to some extent. Anyone with an itch can write some code to scratch it, and if the core developers are okay with including it in the app, it ships. I rather like that, even if most of it gets in my way. There’s an easy solution: I narrow down the modules considerably by customizing which ones I see.
If you’d like to do the same, here’s what I suggest. These are the core modules where I spend most of my time:
- Exposure (lighten or darken an image)
- Filmic RGB (control how light the whites and how dark the blacks)
- Color Calibration (set the white balance)
- Color Balance RGB (enhance colors and color contrasts)
- Diffuse or Sharpen (Sharpen)
- Crop
- Tone Equalizer (raise shadows)
- Retouch (fix spots)
- Rotate and Perspective
Then there are some others I use only occasionally but I like to have around, things like denoise, chromatic aberrations, and LUT 3D since I use a number of LUTs to speed up development. There are a couple others you can see in the screenshots below, but mostly I ignore the other 51 modules.
To make them easier to ignore, I hide them. To customize which development modules are shown, click the hamburger menu at the top of the modules section (which is on the right side of the screen in darktable mode) and select Manage presets.
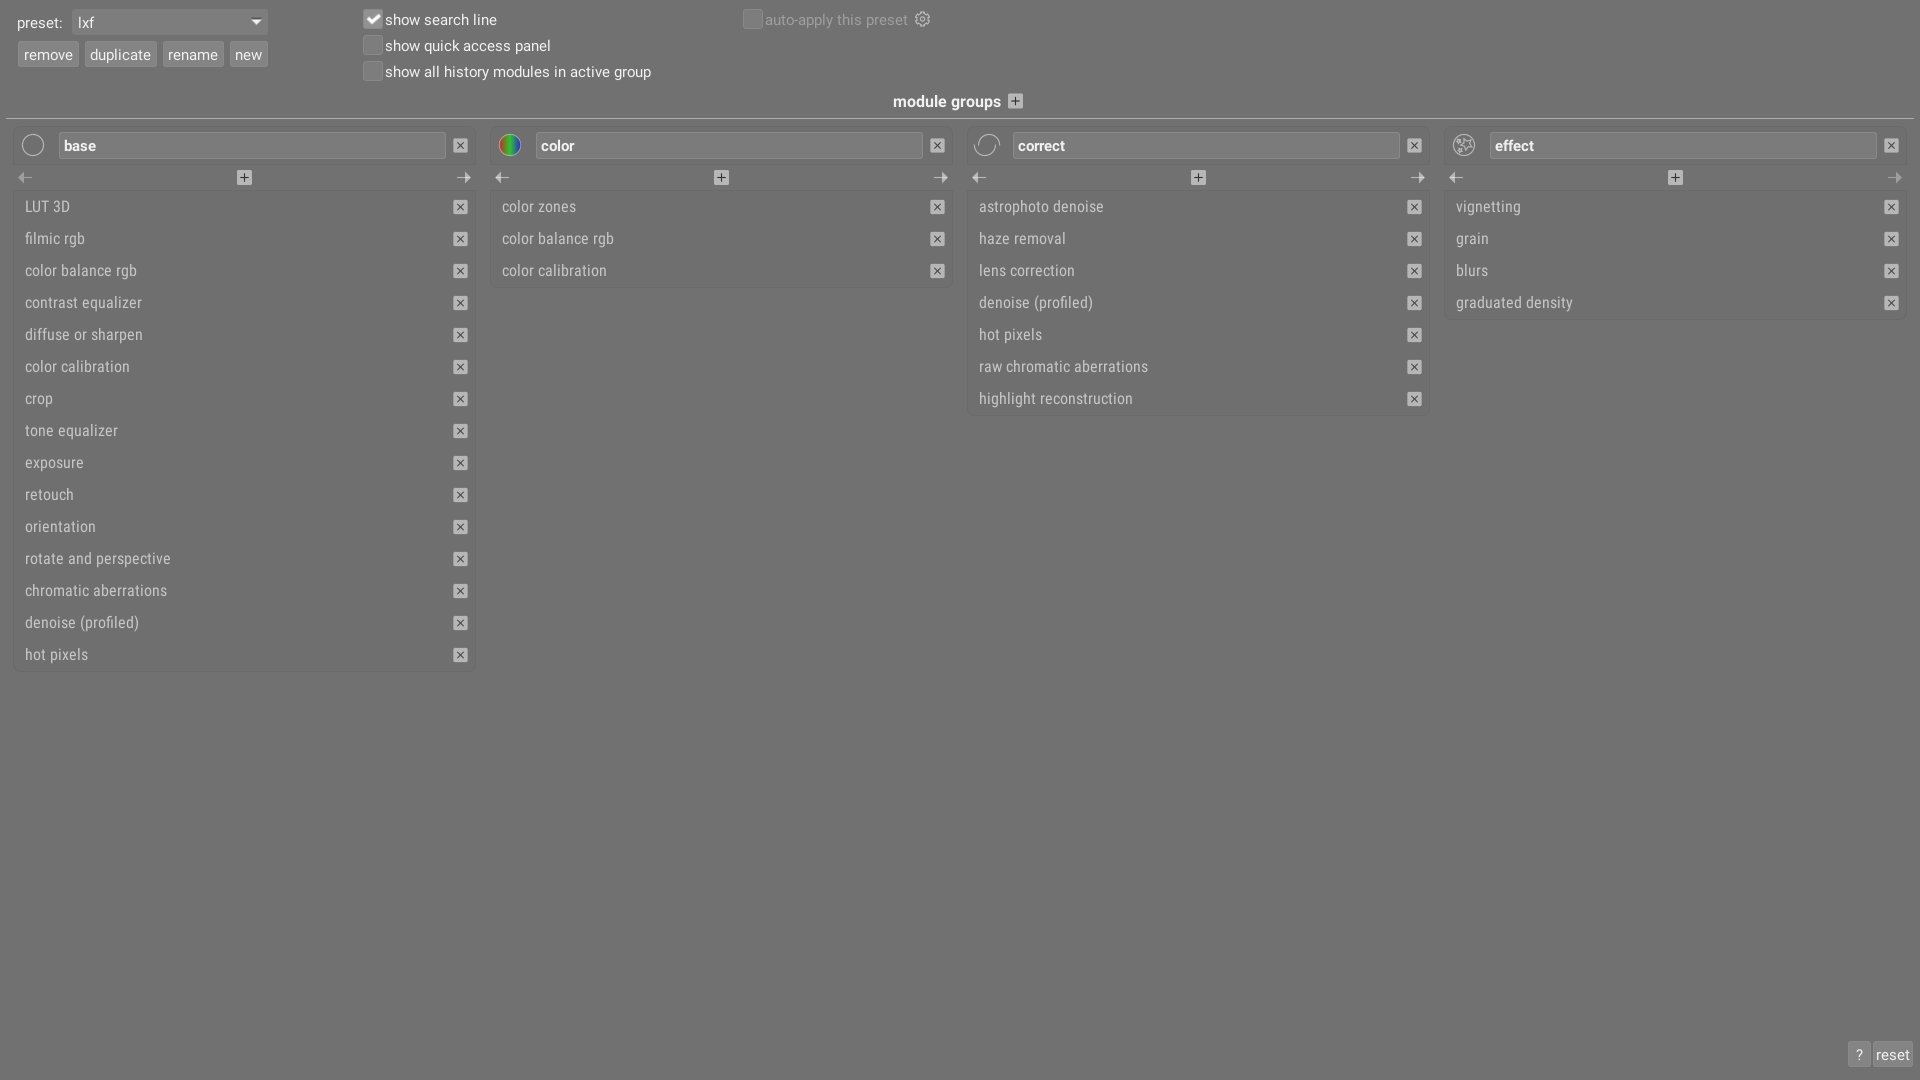
That will bring up a huge screen with all the modules in columns. I suggest first clicking the preset drop down menu and selecting workflow: scene-referred. That gives you all the modules optimized for a scene-referred workflow. It’s not important to understand what that means, but if you’ll recall, we set up Darktable to apply the scene-referred presets when we import new images. This continues using that same workflow. We want to use those modules, but not all of them, so select duplicate and give your new module layout a name. Now you can customize this layout. I start by deleting the quick access column completely because I don’t need it, nor do I find it quick. There’s a checkmark at the top of the screen to disable it.
Then I set up the other four like this:
When you have things set up that way hit… wait for it… escape to save your changes. Still weird, but maybe less so after the third time. Or not. I still think it’s weird.
Example Edits (Video)
Okay, you now have Darktable set up just like I do. This may or may not end up suiting you, but for now it gives you place to start. To show you how I work within this setup, check out the video below and then you can jump to the next article in this series, which covers what each module does and how I use them (coming soon).
Thoughts?
Please leave a reply:
All comments are moderated, so you won’t see it right away. And please remember Kurt Vonnegut's rule: “god damn it, you’ve got to be kind.” You can use Markdown or HTML to format your comments. The allowed tags are
<b>, <i>, <em>, <strong>, <a>. To create a new paragraph hit return twice.