How I Develop Photos With Darktable
Workflow ideas to speed up your Darktable processing
This guide is kept up-to-date with Darktable releases. It is currently written for Darktable 5.2, released June 2025. Be sure to read part 1 before you read this. Also note that I have been experimenting with Darktable’s new AgX module, due out in Dec 2025 and it’s likely going to replace Sigmoid and Color Balance RGB for me in most cases, as it does a better job and does it faster. I’ll update this guide when AgX is out of beta.
There are several tools out there to develop camera RAW files into printable images, some of them are shockingly expensive. Fortunately, I have found I get the best image results using Darktable to process my RAW files. Darktable is free and open source, but it can be overwhelming at first. I’ve been using it to process my RAW files for 10 years now, and I thought I’d put together a short guide to how I do it. Before we dive in, make sure you have read the first tutorial on how Darktable works and how I set it up.
I hate staring at a computer screen, so much of my workflow is focused on speed. As I noted in the first tutorial, there are many ways to do things in Darktable. This is not the right way to develop your RAW images, it’s just my way of developing RAW images.
Note that Darktable is updated twice a year and things do change. I find new tricks from time to time too so this is a continuously evolving workflow. I will keep this guide updated to reflect both changes in Darktable and changes in my own workflow.
Step 1: Crop, Rotate, and Lens Correction
The first thing I do is turn on the Lens Correction module. This will fix any vignetting and lens distortion. I shoot with adapted lenses occasionally though, so sometimes there’s no profile to correct. Sometimes if something is real bad I’ll mess with it by hand, but usually if there’s no profile for my lens I just skip this step.
Next up I do any cropping I want to do with the Crop module, and fix crooked horizons with the Rotate and Perspective module. When it makes sense anyway. Sometimes a tilted horizon is part of the story, so don’t just do this stuff without thinking about it first.
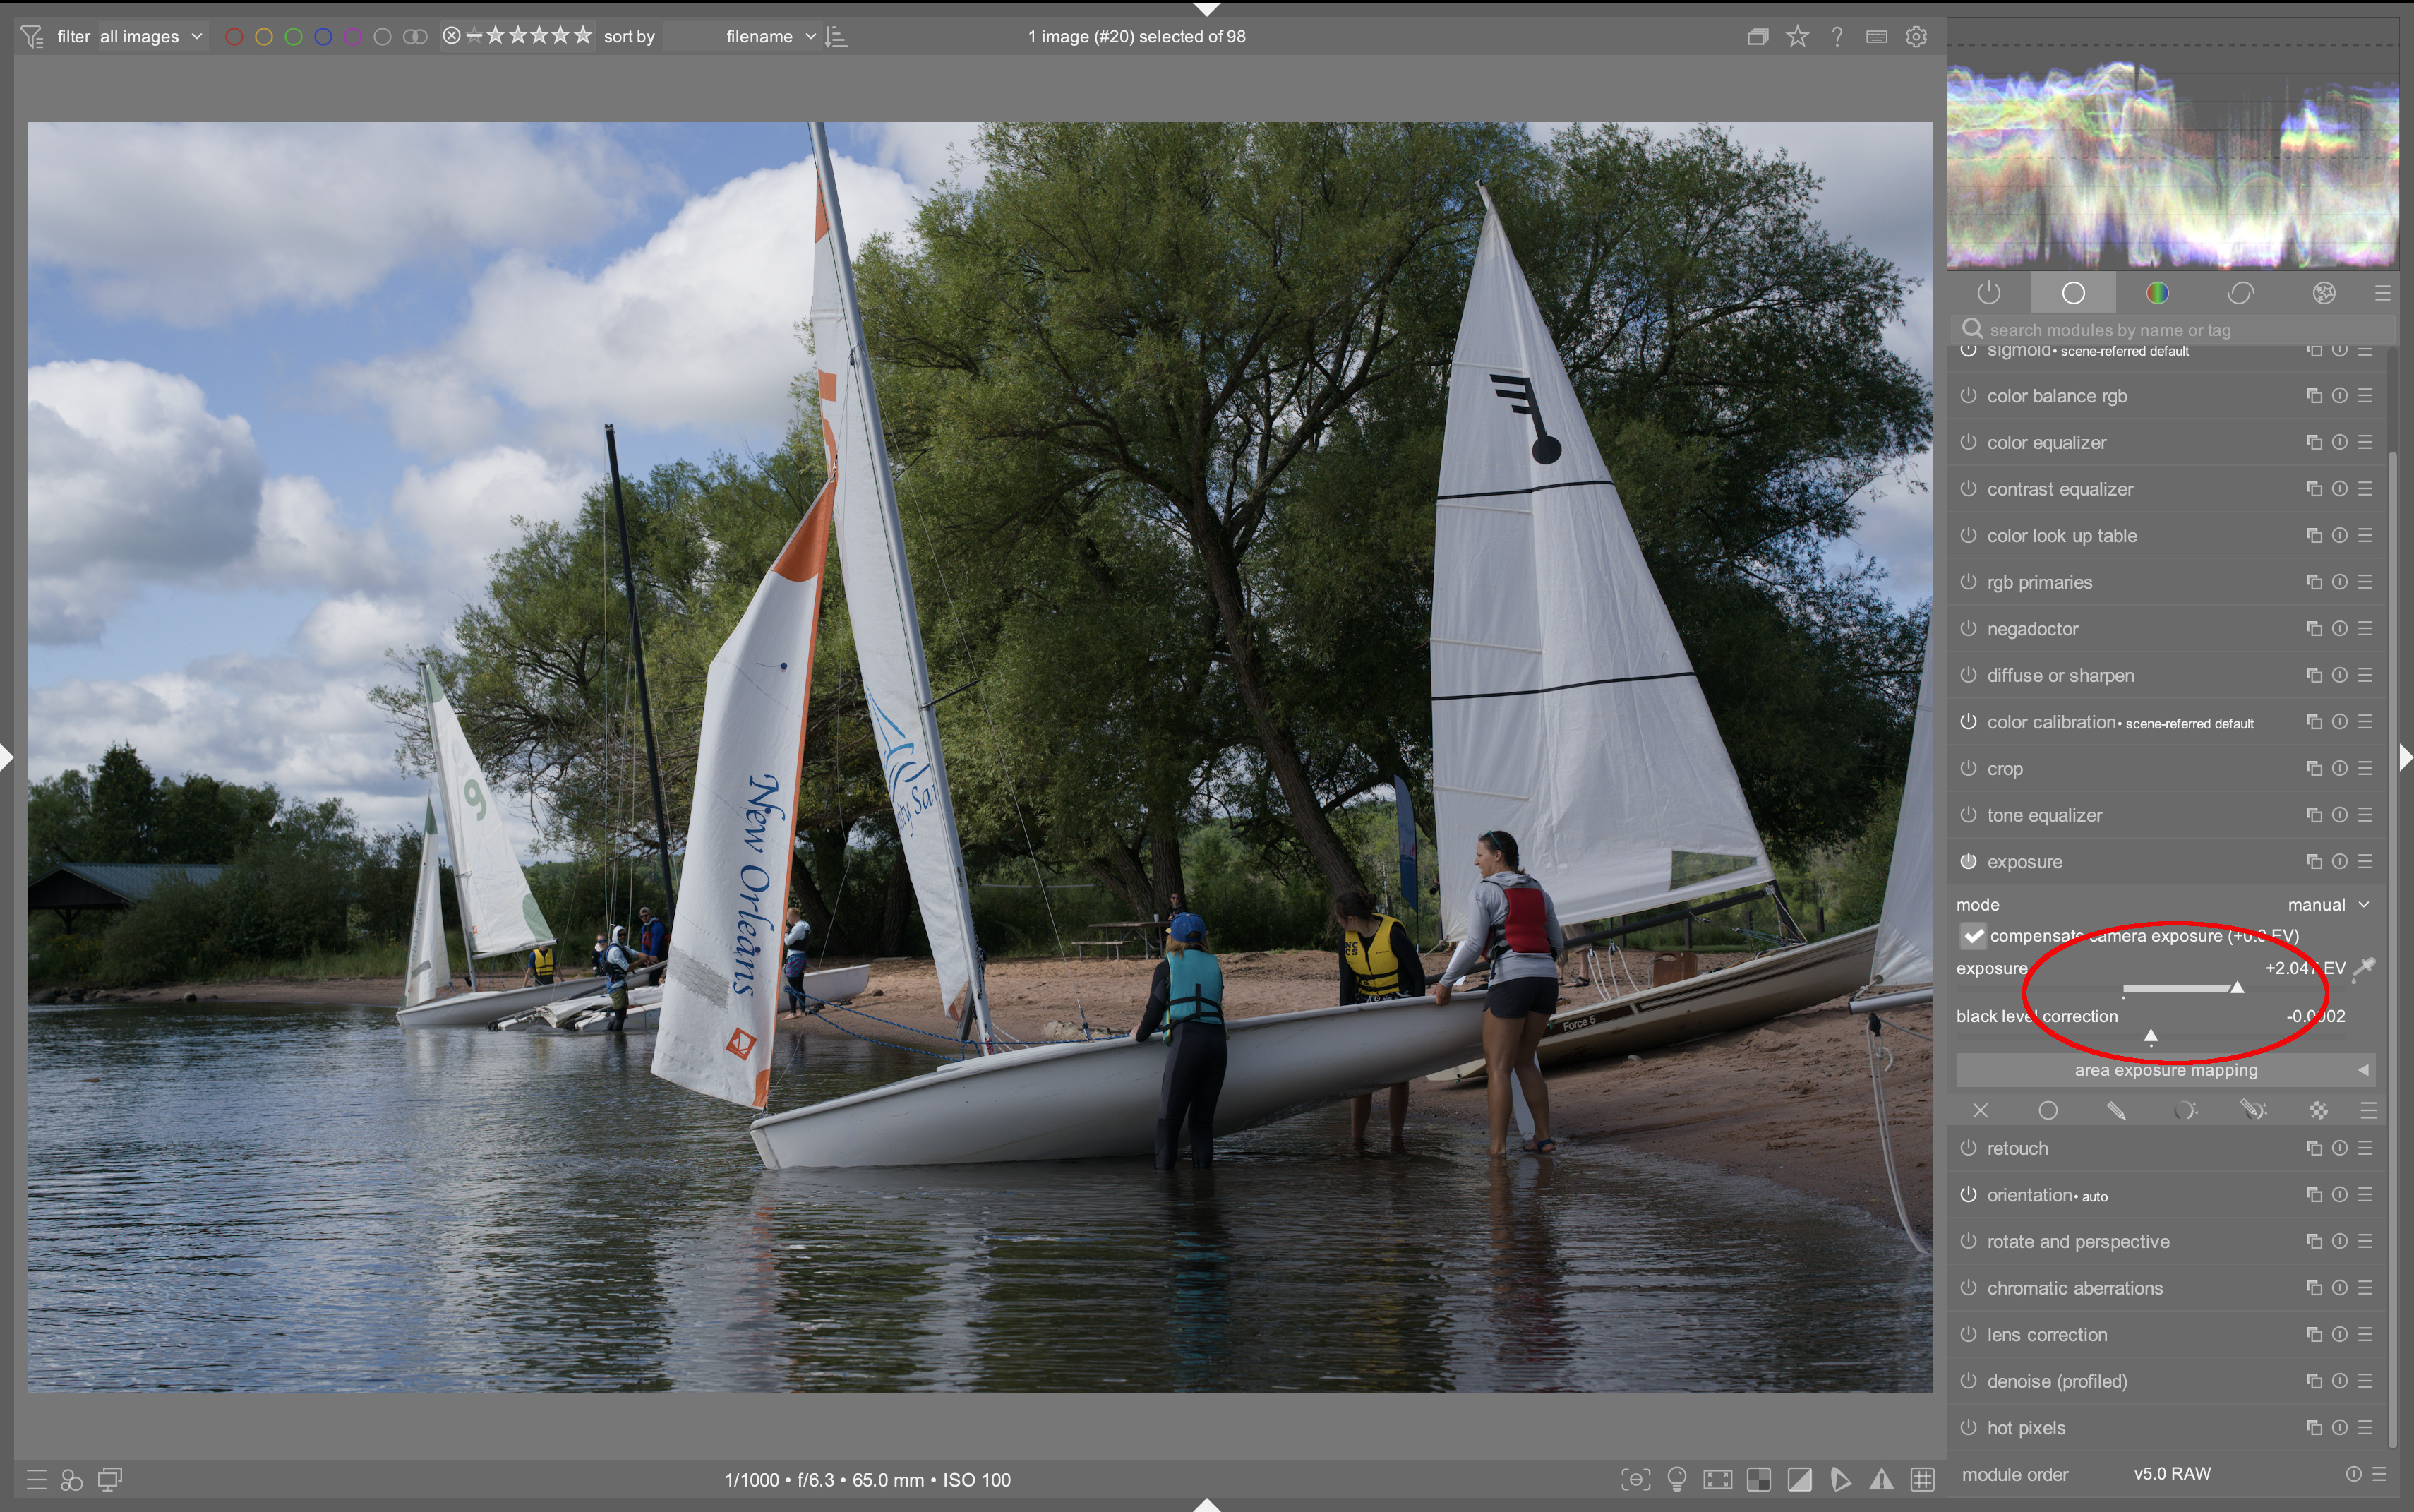
Step 2: Exposure and White Balance
I tend to underexpose when shooting digital. It’s easier to bring up the dark areas than recover blown highlights. Unless I am trying to blow the highlights, I underexpose my images by at least a stop. My first step then is to use the Exposure module to increase the exposure. I never touch anything else in this module, just slide the exposure up until I get the image where I want it.
Once exposure is dialed in how I want it, I move to the Color Correction module to work on white balance. I start by hitting the little eyedropper, which looks at the image, runs some kind of algorithm and makes a stab at adjusting the white balance. I am almost never happy with the results of the eyedropper, so I tweak the chroma slider to where I want it, usually warmer than what the algorithm picked. Occasionally I mess with the hue slider, but not very often.
If there is something in the image that you know is pure white then you can hit the eyedropper and select just that portion of the image.
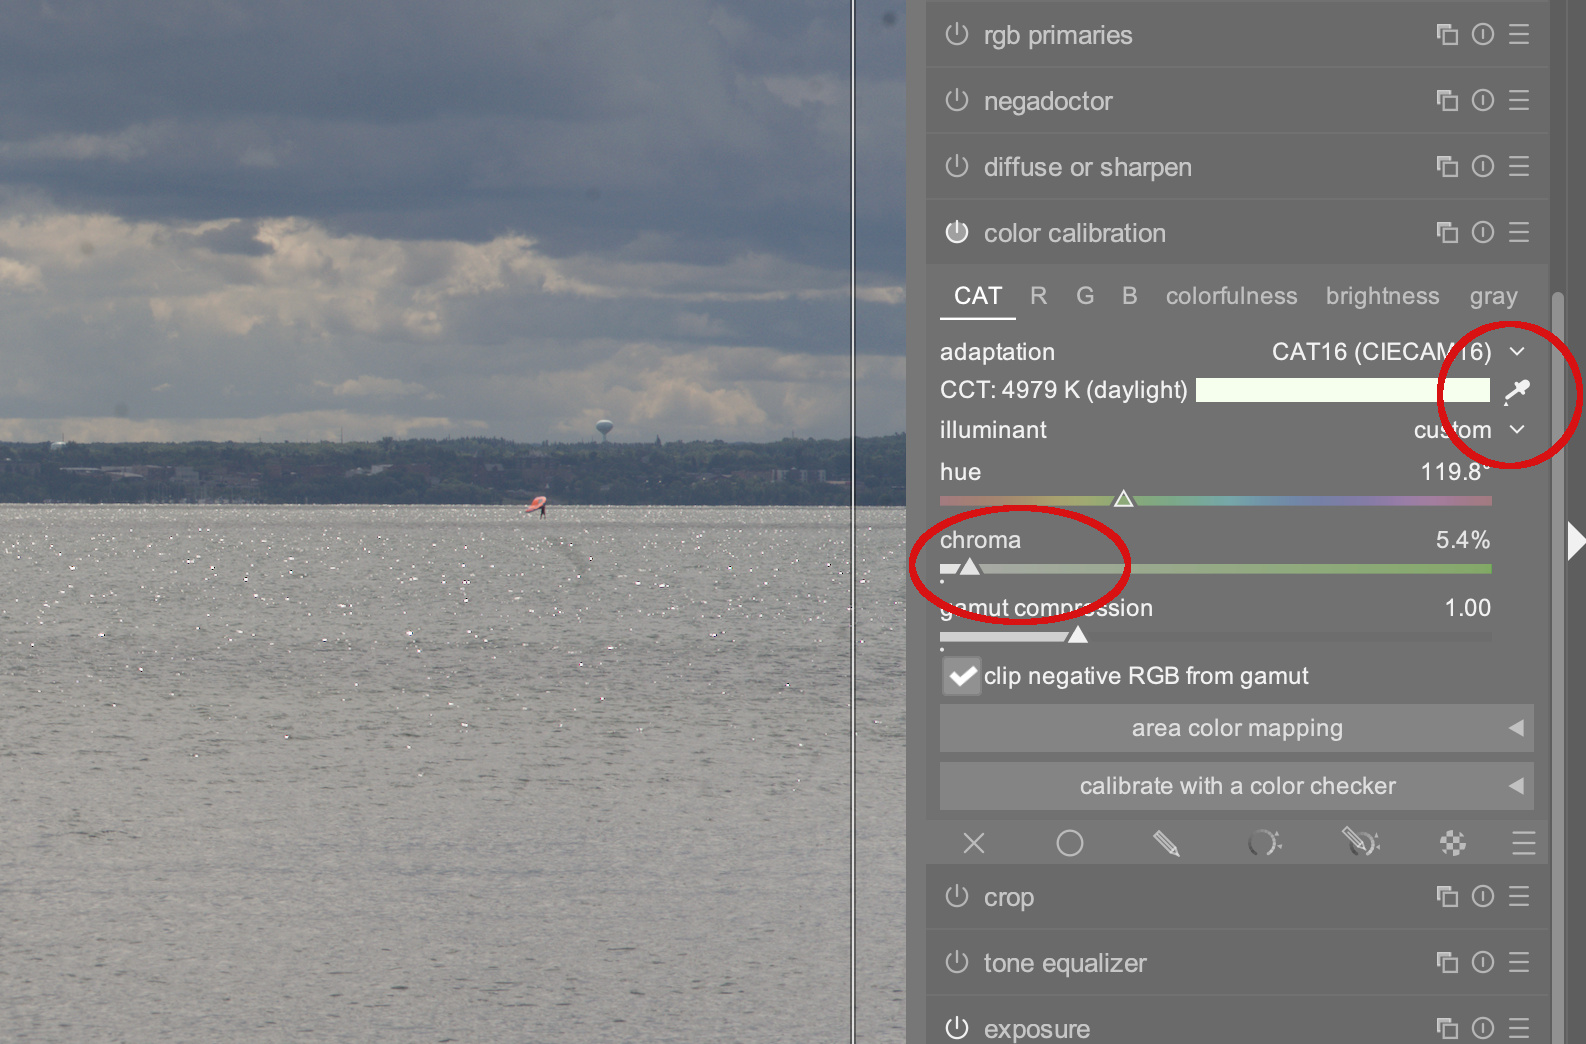
As an aside, I never shoot with my camera set to Auto White Balance. I always shoot at about 6500-7000K for white balance. I don’t want to record an abstractly correct color rendering, I want to record what I saw, and this generally matches what I see. Consequently I often just leave the white balance where the camera set it (the default in Darktable).
Step 3: Color and Contrast
The next place I go is the Sigmoid module. If the image doesn’t need much contrast adjustment I often just leave the Sigmoid at its defaults. Lately I’ve been using a preset called Smooth sRGB that I got from Boris Hajdukovic. Here is a screenshot you can use to set it up for yourself if you like. Just set the sliders where I have them and then click the little three line icon on the top of the Sigmoid module and choose “Store new preset”.
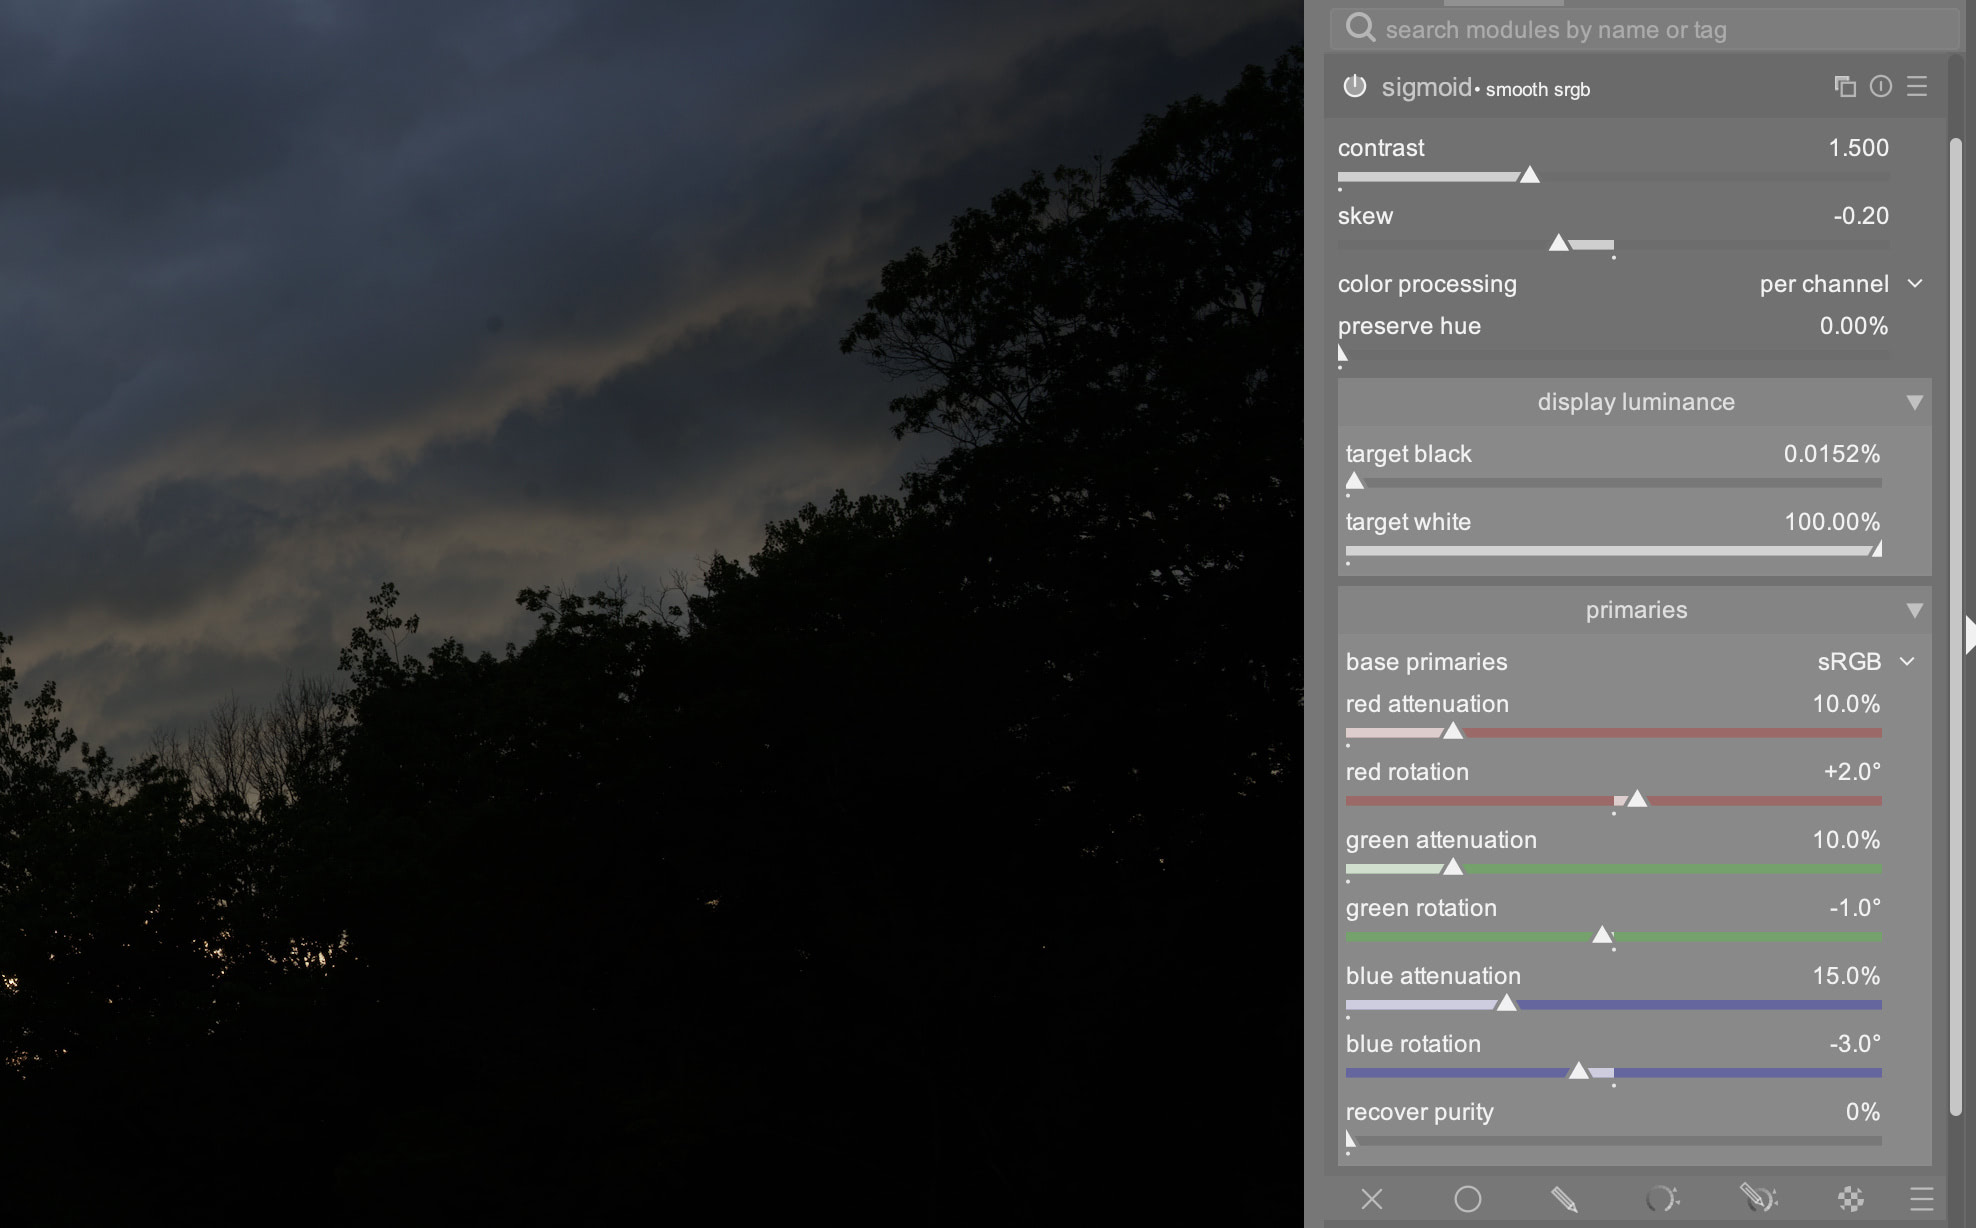
But even when I use that preset, it’s just a starting point. I’ll still spend a few seconds playing around with the contrast and skew sliders until the look suits the image I’m working on.
Again, I don’t always use this preset. Often I do nothing with Sigmoid, the defaults work for the image. Other times I just tweak the default contrast and skew sliders to get things where I like them.
I mainly increase contrast by increasing color contrast, which is the next step.
By now the exposure, white balance and basic color look should be roughly as I want them. The next thing I do is bump up the color contrast and saturation using the Color Balance RGB module. I used to use a lot of presets here, but these days I don’t. Mainly I just head to the bottom of the first tab, to the perceptual brilliance grading, and slightly increase the highlights slider and decrease the shadows to add some color contrast. Most images from my Sony don’t need much of this, just a about +10 percent for the highlights and -10 for the shadows. Fujifilm files usually need even less, often nothing.
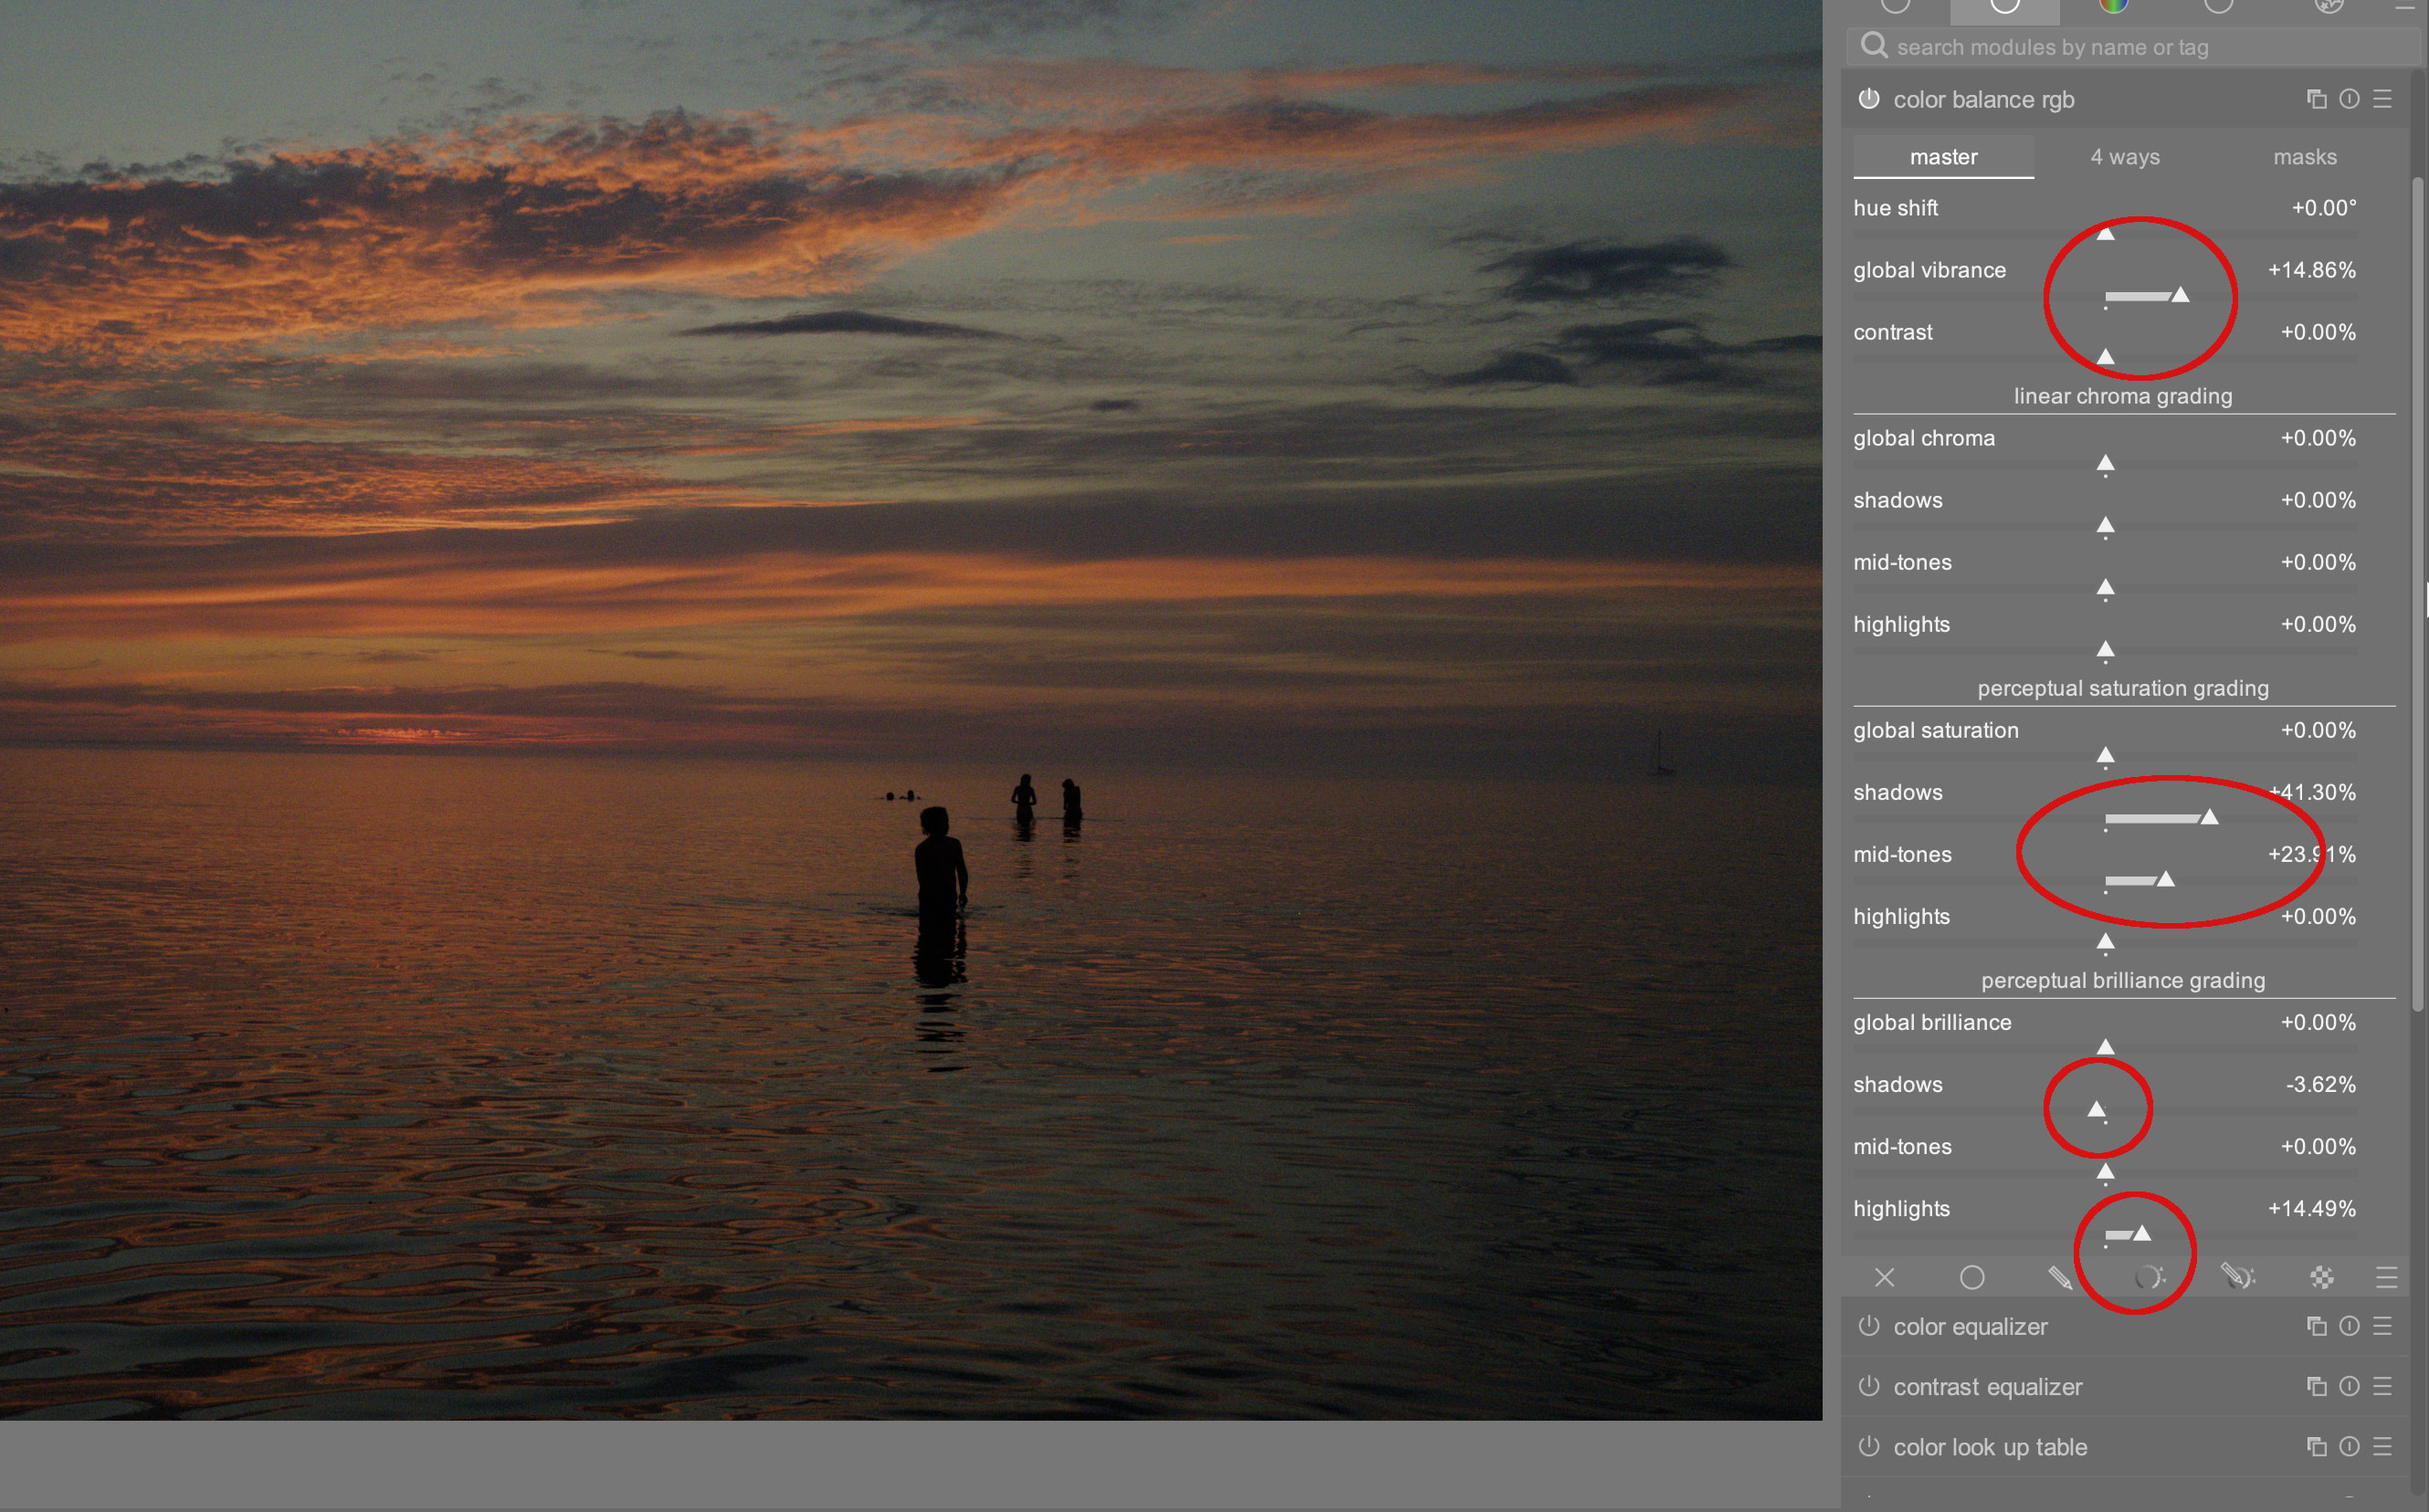
Then I head up to the section above that one, perceptual saturation grading, and I increase the perceptual saturation for the midtones and shadows. Then at the very top I increase the overall vibrance.
How much I mess with the various Color Balance tools varies tremendously according to the photo. This is where I end up spending most of my time though. I sometimes use the 4 ways tab to change tones, warm or cool greens for example, but that’s only when I have some specific vision in mind.
Step 4: Touch Up and Sharpen
Once I have the image looking more or less the way I want it, I use the retouch module to fix any sensor spots or other blemishes (I change lenses a fair bit so dust gets on the sensor). I’ll also toggle Denoise (profiled) at this point, and if there are any chromatic issues, Chromatic Aberrations. Most of the time I leave these at the default, but sometimes I back off the Preserve Shadows slider in Denoise.
I do these last 3 tweaks before I sharpen the image because the sharpening is processor intensive and doing anything after that point is very slow.
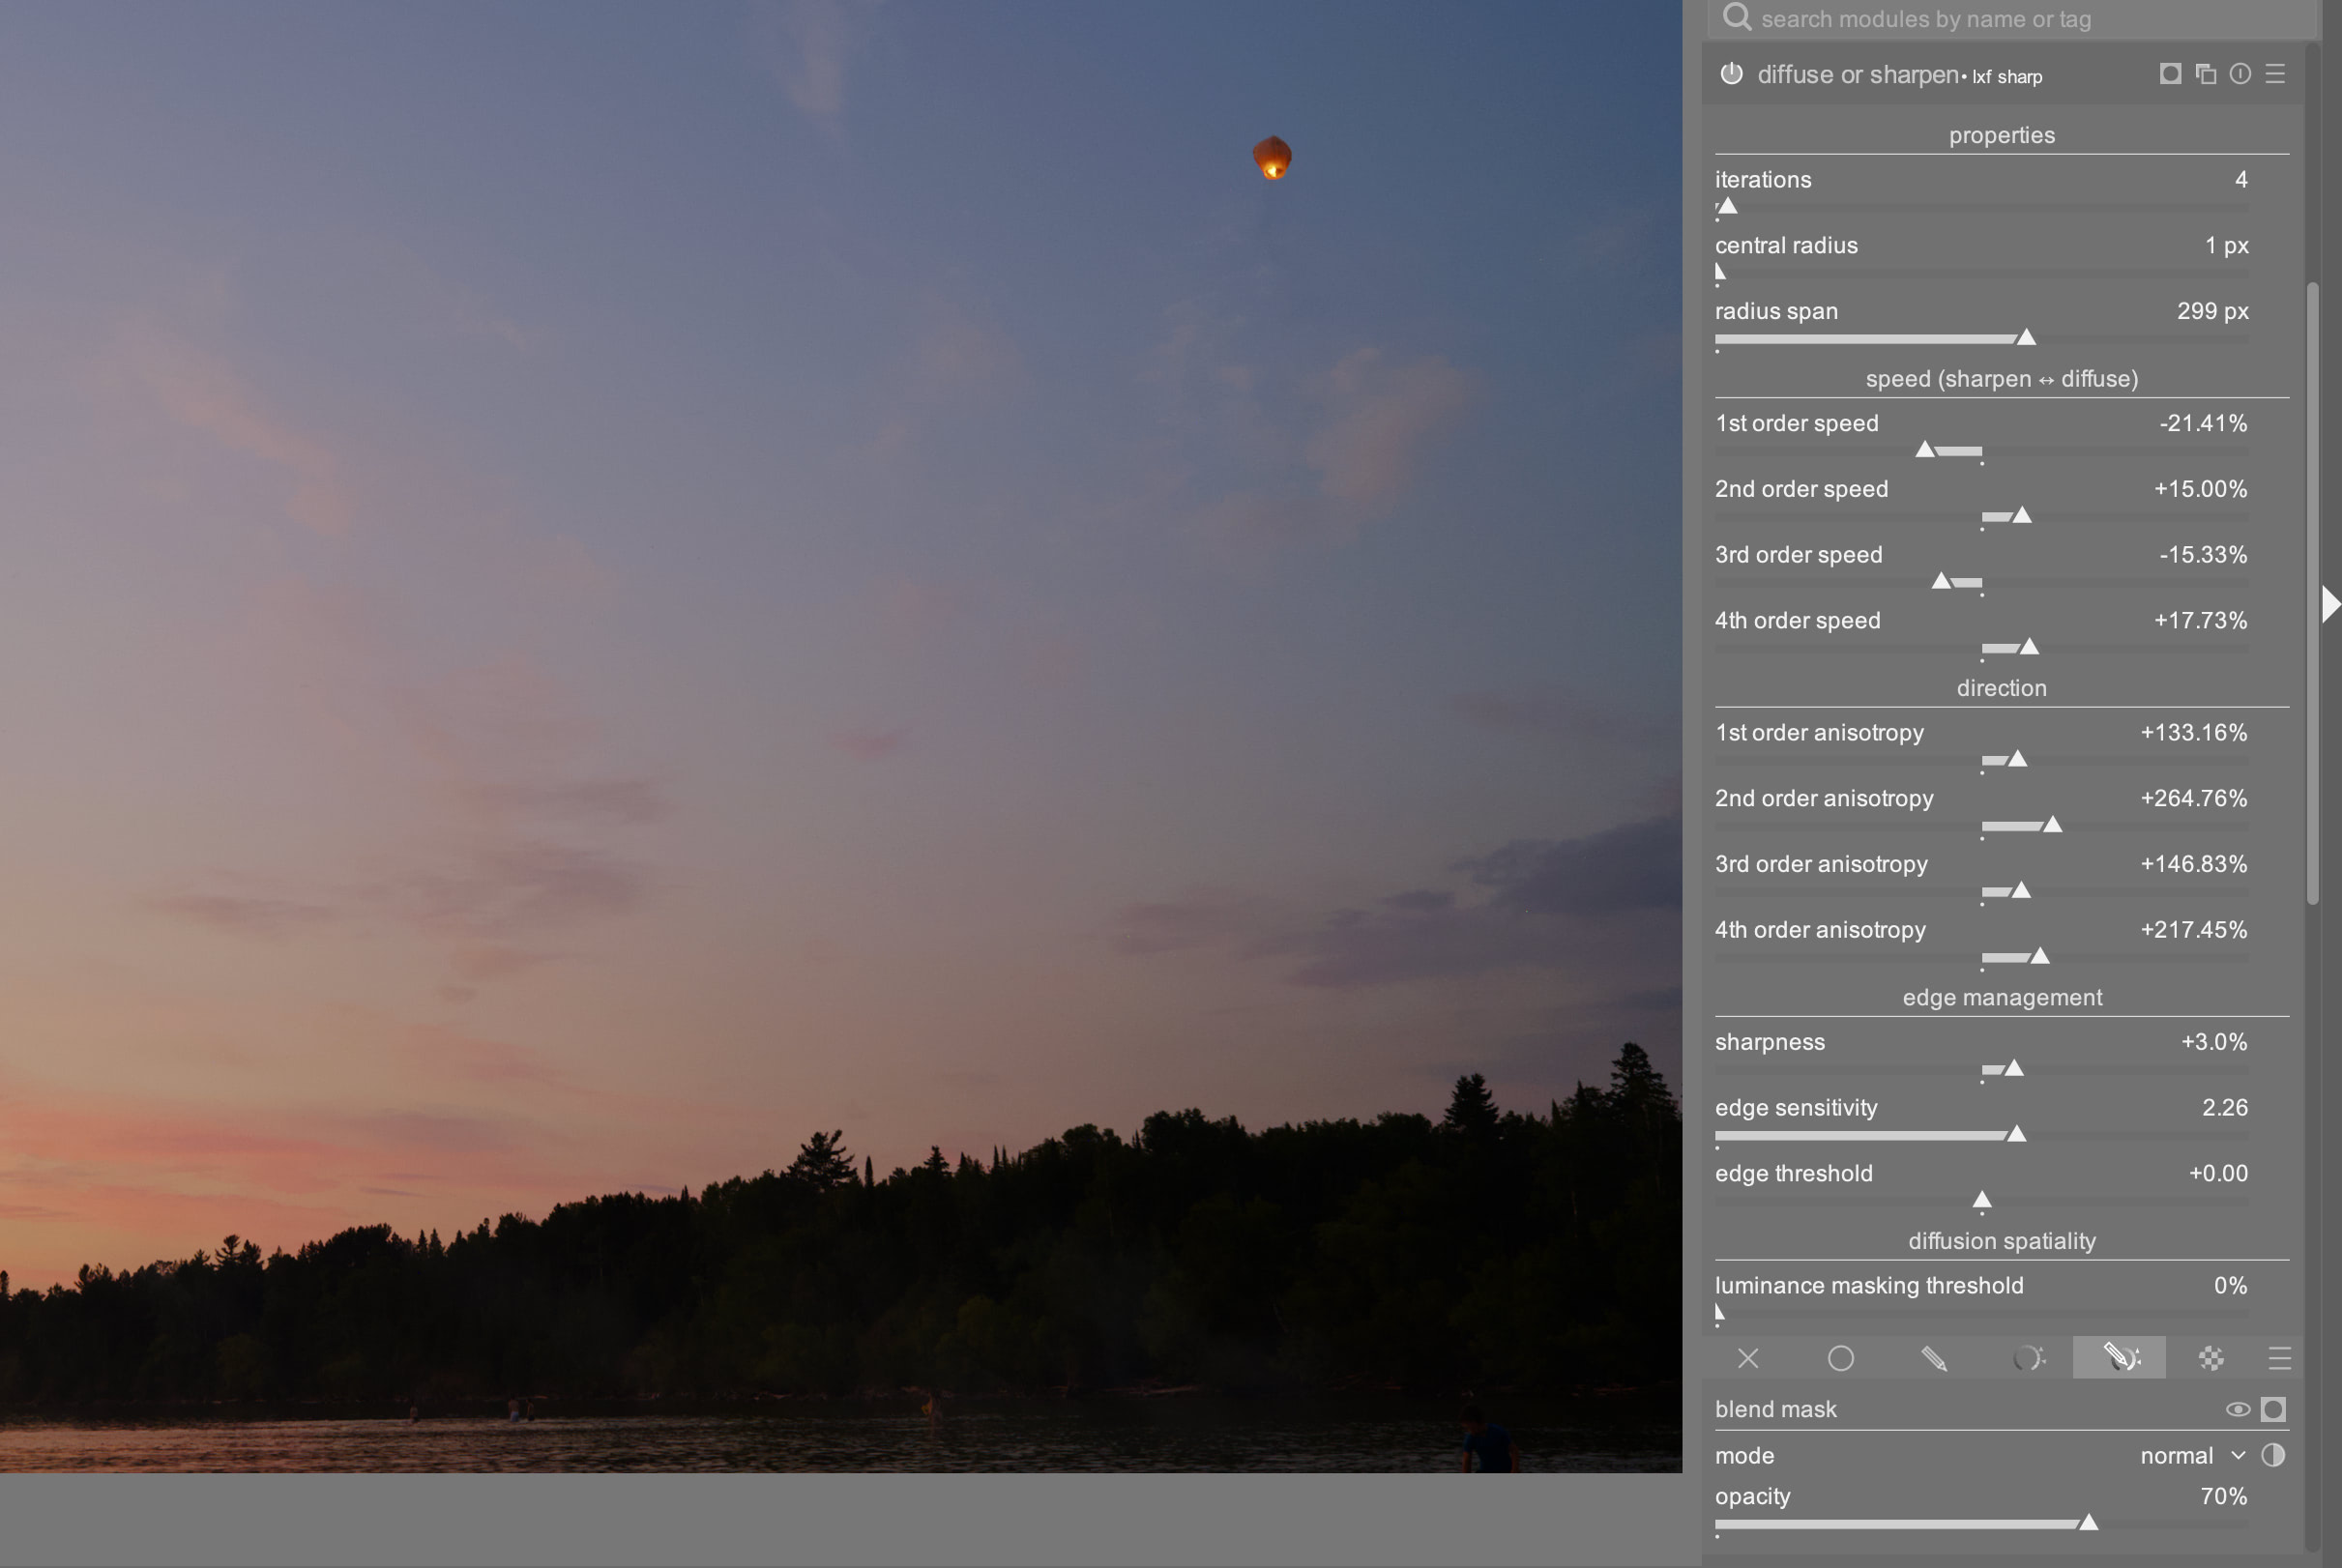
The last thing I do is sharpen with the Diffuse or Sharpen module. I use a couple presets, the main one you can see in the screenshot below.
And that’s it. I then export a JPG and either post it here on luxagraf or, more often, print it in some way shape or form (lately I’ve been making more books).
Step 5: Other Things I Sometimes Do
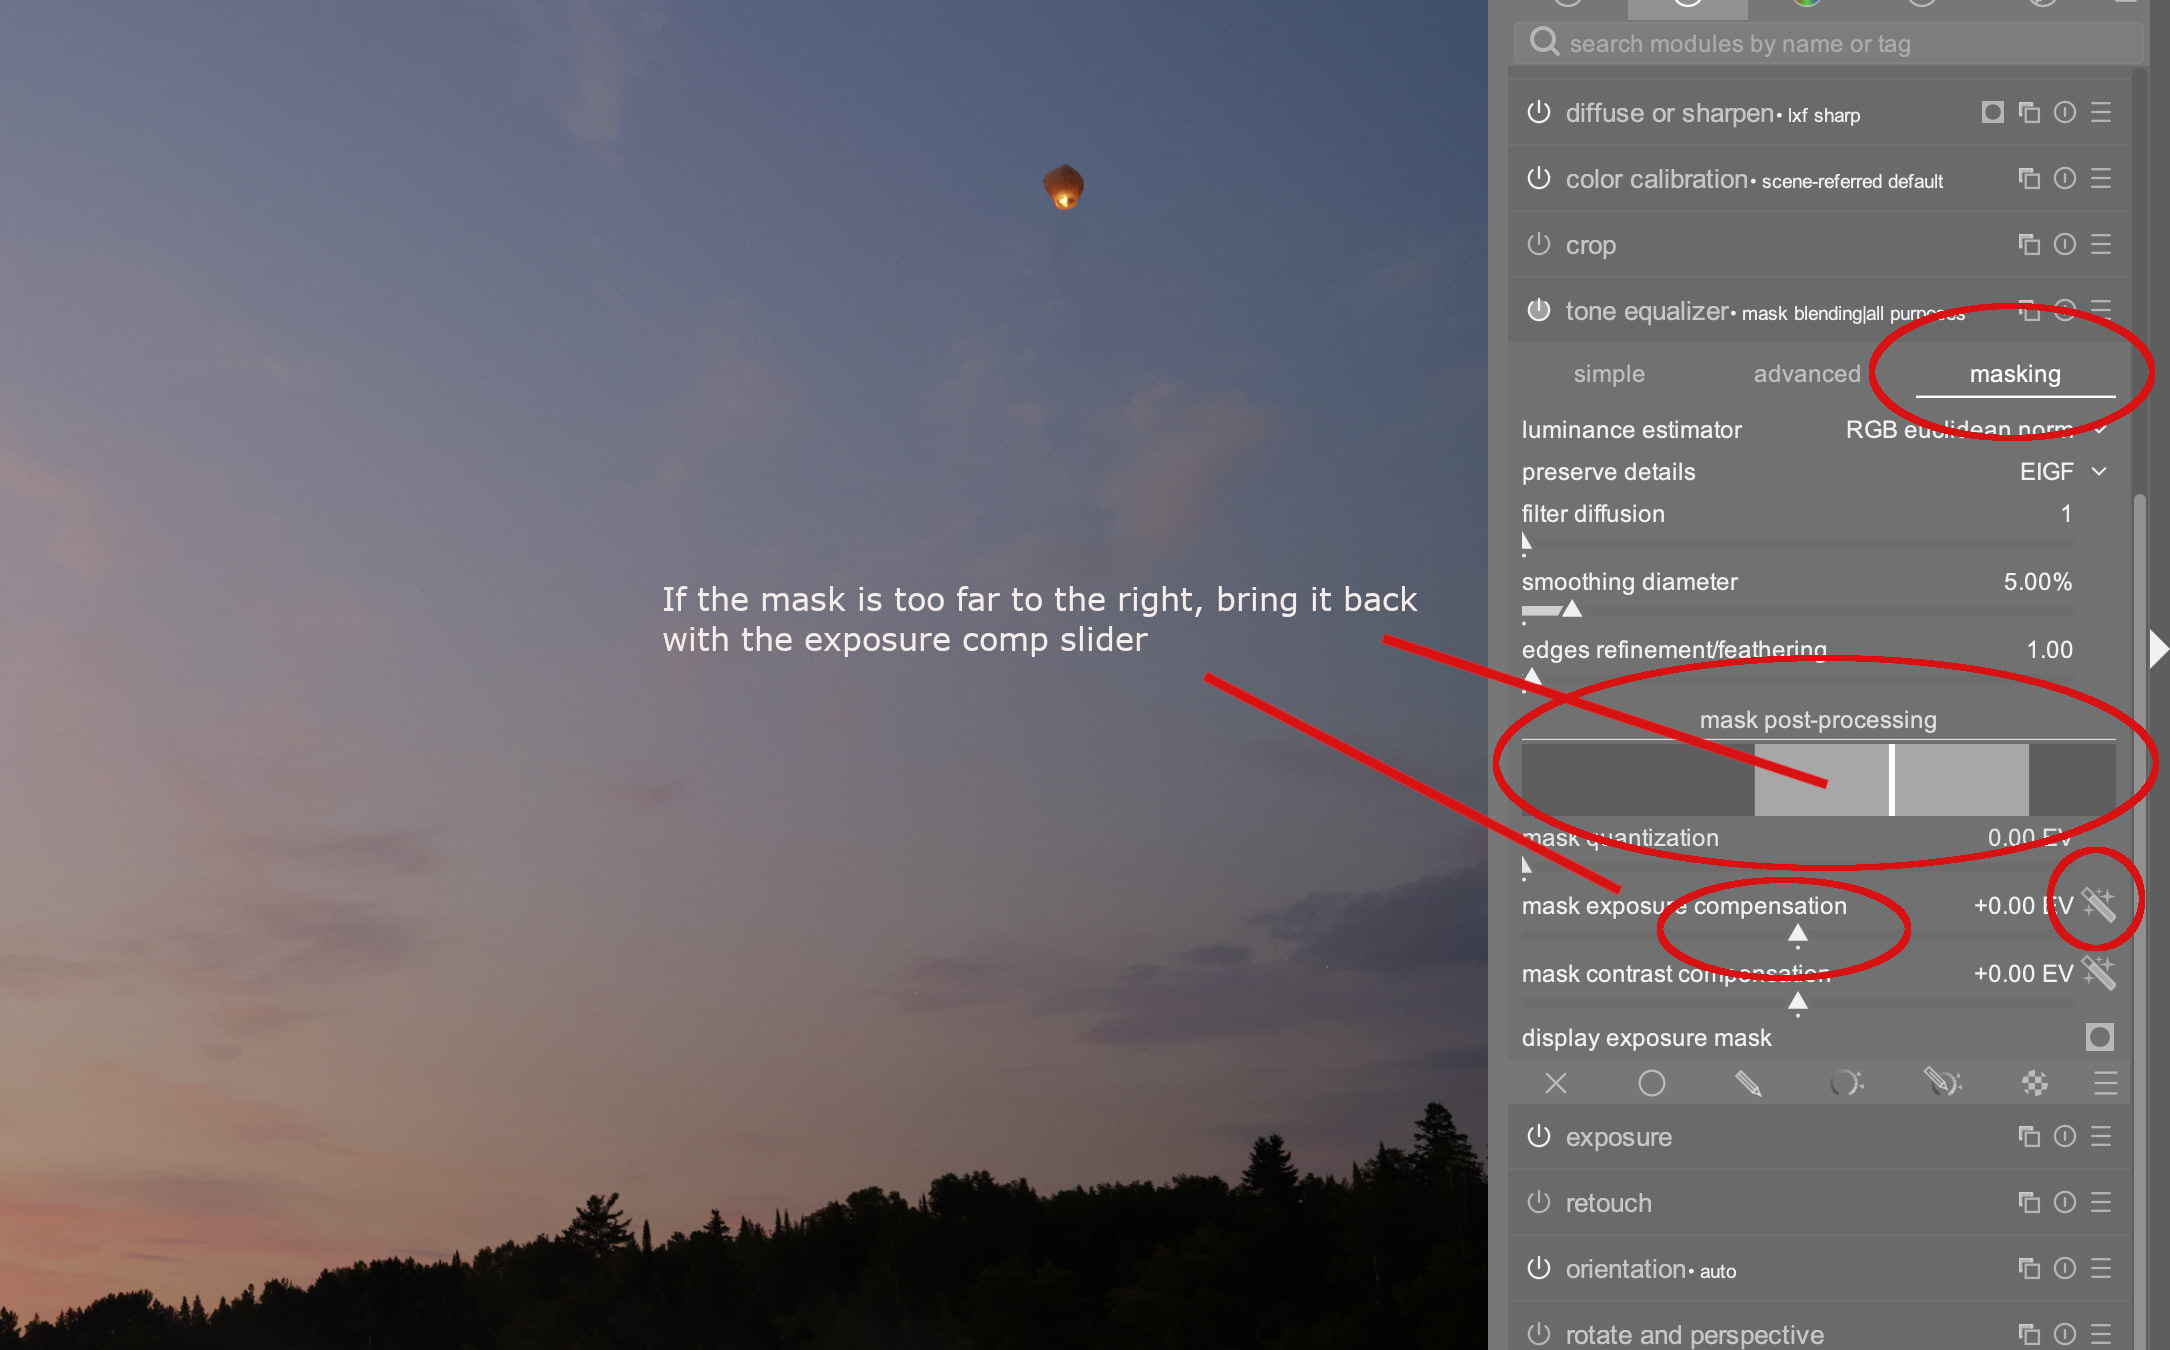
While that covers the 90 percent use case, sometimes I do use the Tone Equalizer module to lift shadows. Tone Equalizer can be confusing. Here’s what I do. First go to the Masking tab and click the wand next to Mask Exposure Compensation. This will shift the mask so that the tones are centered and easier to work with. A good bit of the time the wand alone is enough, but if you have clipping (it’ll show as orange over on the highlight side), just decrease the mask exposure compensation slider to bring it back away from that edge.
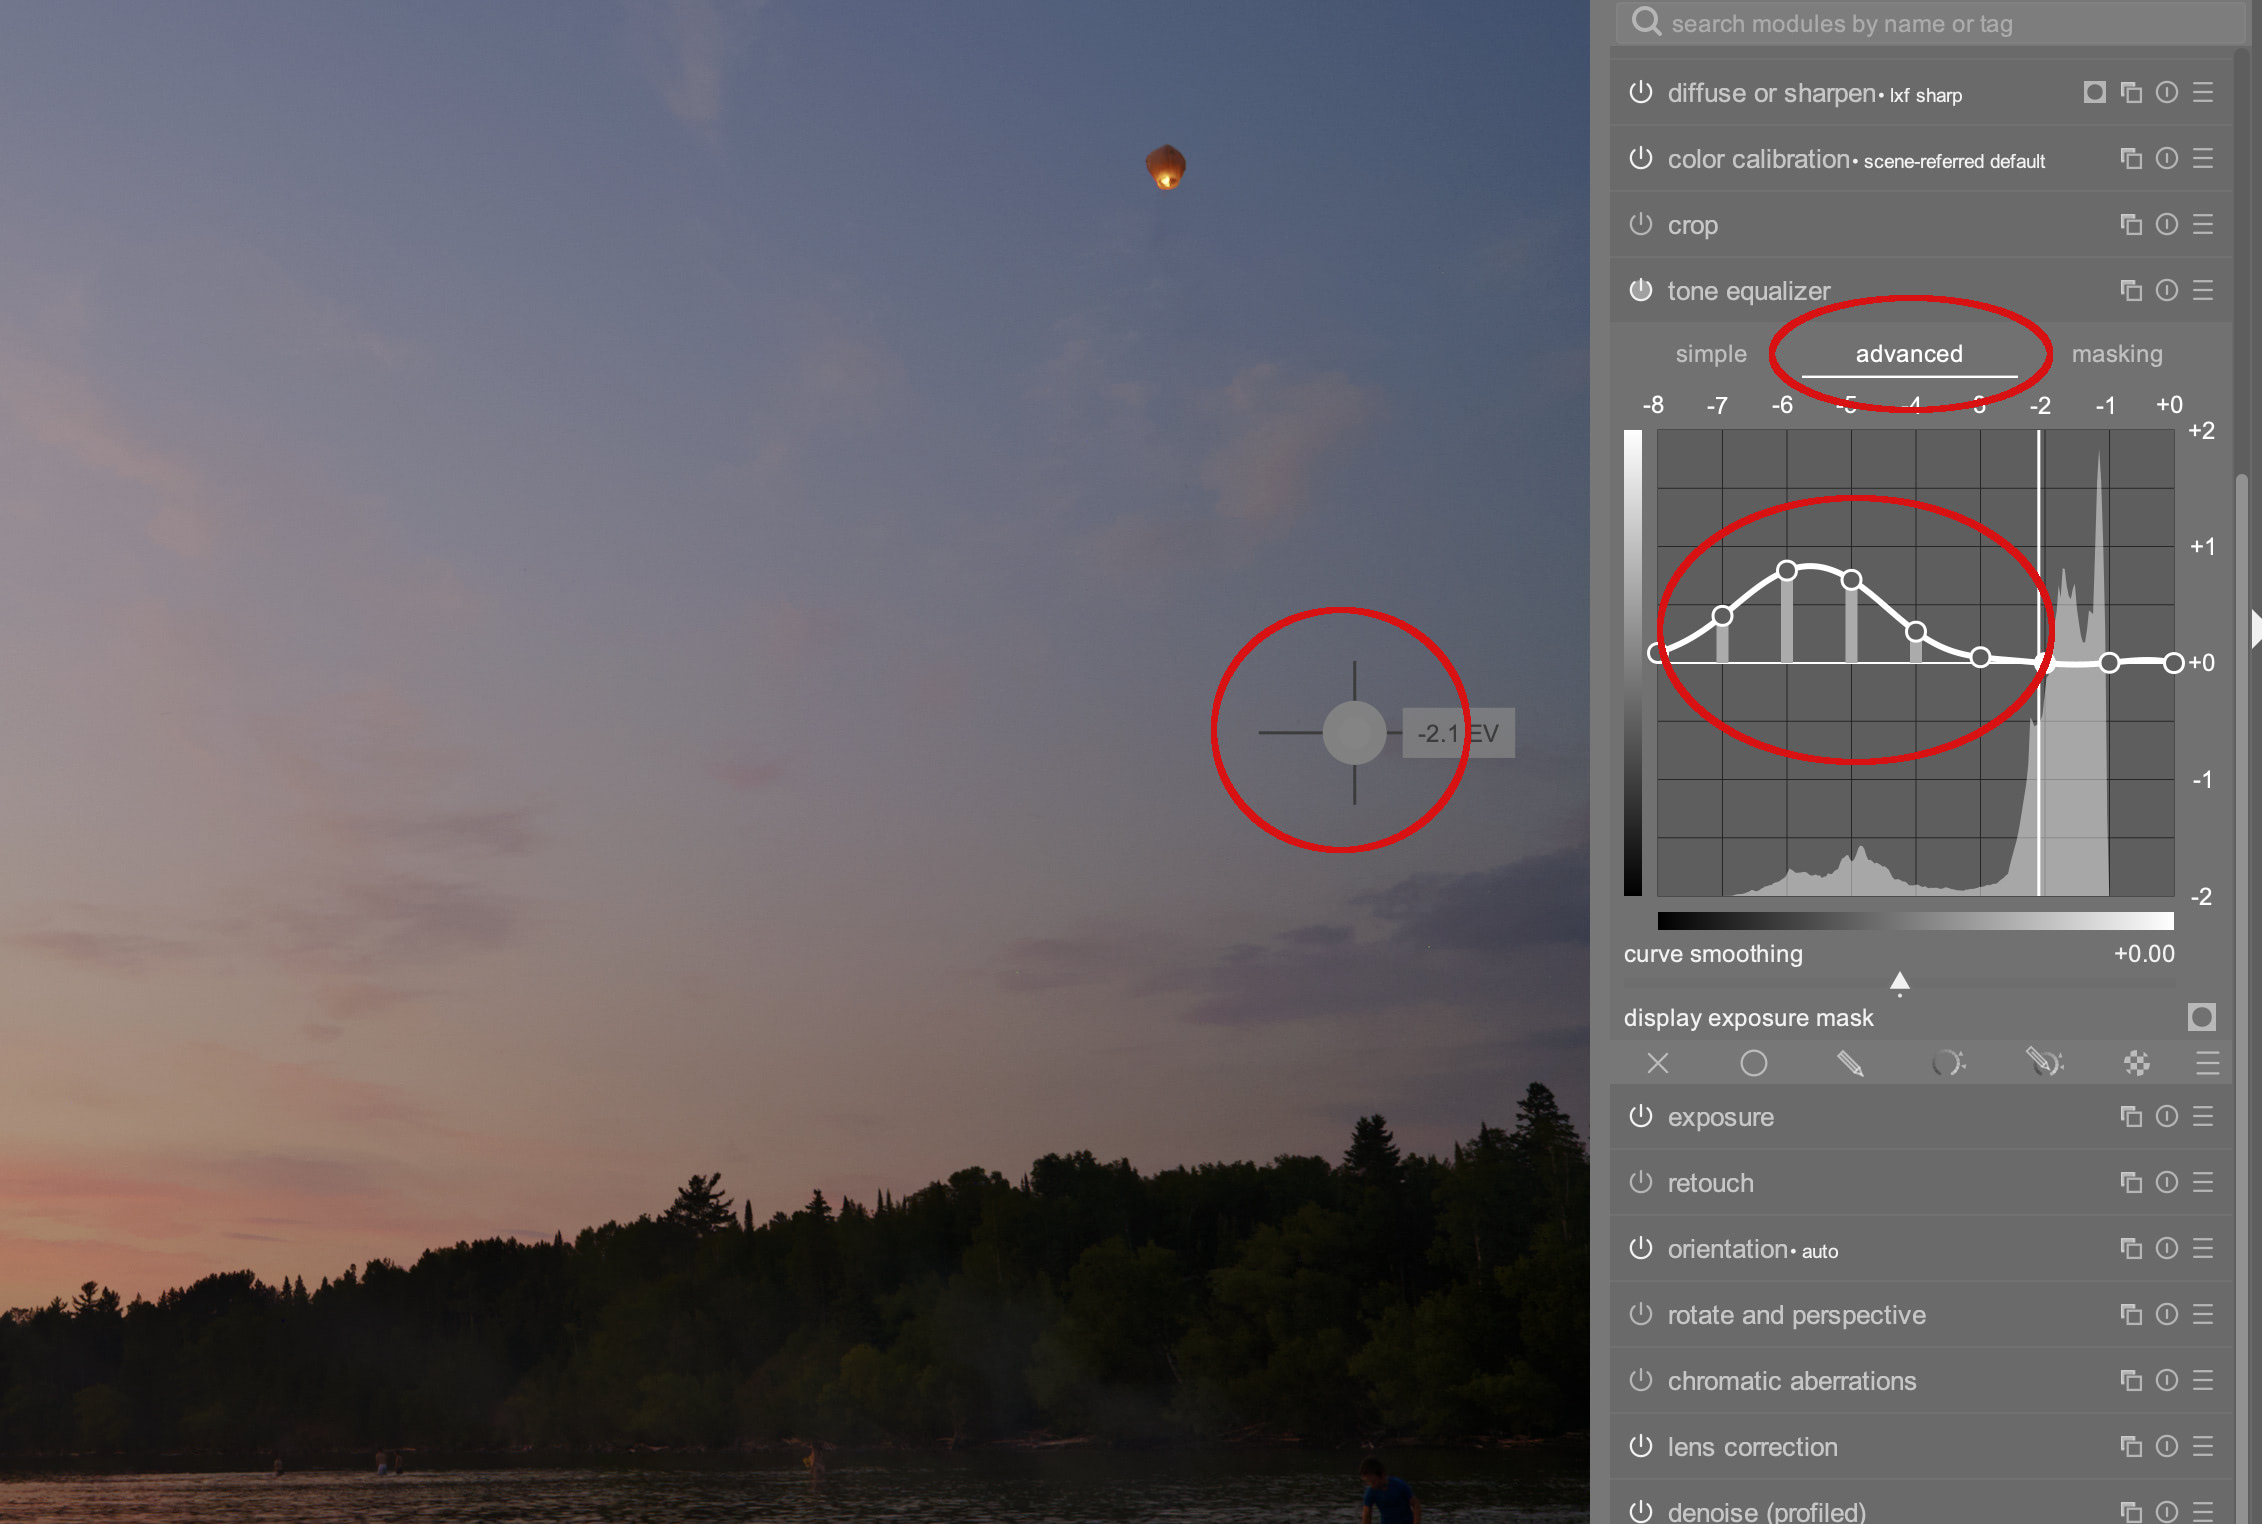
Then switch to the middle tab, Advanced, and adjust the linear curve to raise the shadows. You can also move your cursor over the parts of the image you want to change and use the scroll wheel to lighten that area directly from the image (the cursor changes to a target symbol and shows you the current exposure setting).
The only other modules I use are the LUT module when I want to get a specific film look, Negadoctor when I am working with film scans, and finally, if I am making a black and white image, I usually do that using the Color Calibration module, but that’s complicated enough that it deserves its own post.
There you have it then. I would say on average this process takes me 1-5 minutes per image, heavily weighted toward the 1 minute side of the scale. It’s still a bit of work, and there are plenty of times that I use JPGs straight out of the camera (especially from my Fujifilm x70), but when an image needs a little work, this is how I do it. I hope maybe this can help other people get going with Darktable. If you have questions drop a comment below.

3 Comments
Thanks for your post! Very few Darktable users I have been able to find talk about their editing process for printing. I see you are processing to occasionally print. I have been following Boris’ work ( you reference above) on Youtube, his images look stunning, but I find when I replicate his extreme moves, I am regularly getting out of gamut warnings. Am I doing something wrong or is he editing for screen only and not concerned about gamut issues for printing? I appreciate any insight you might have. Cheers!
Jay-
I suspect most people don’t print much, but I don’t know for sure. I haven’t had many issues with out of gamut colors when printing, but I haven’t done anything really high end. I mostly just make little books using services like Blurb, or print a bunch of 4x6s with Printique.
As for Boris’s stuff, I would ask him on the Pixls discussion forum. He’s pretty active over there and frequently makes videos based on people’s questions, and how to keep things in gamut for print is a good question.
Thank you! Your Darktable explanations were a huge help.
I am trying to edit portraits of my newborn grandchildren and as well as the other corrections, I would like to fix background wrinkles and highlights. I am having a hard time with figuring out masks and the retouch module.
Do you know where I can get your quality of explanation for that type of editing?
Thank you!!
Thoughts?
Please leave a reply:
All comments are moderated, so you won’t see it right away. And please remember Kurt Vonnegut's rule: “god damn it, you’ve got to be kind.” You can use Markdown or HTML to format your comments. The allowed tags are
<b>, <i>, <em>, <strong>, <a>. To create a new paragraph hit return twice.