Create a Debian 9 Stretch Vagrant Box
I’m a little old fashioned with my love of Vagrant. I should probably keep up with the kids, dig into to Docker and containers, but I like managing servers. I like to have the whole VM at my disposal.
[Note: Everything here is still true and will work, but I have switched to using lxd rather than Vagrant. If I were using Vagrant though, I would still absolutely be using my own Debian image.]
Why Vagrant? Well, I run Arch Linux on my laptop, but I usually deploy sites to either Debian, preferably v9, “Stretch”, or (if a client is using AWS) Ubuntu, which means I need a virtual machine to develop and test in. Vagrant is the easiest way I’ve found to manage that workflow.
When I’m deploying to Ubuntu-based machines I develop using the Canonical-provided Vagrant box available through Vagrant’s cloud site. There is, however, no official Debian box provided by Debian. Worse, the most popular Debian 9 box on the Vagrant site has only 512MB of RAM. I prefer to have 1 or 2GB of RAM to mirror the cheap, but surprisingly powerful, Vultr VPS instances I generally use (You can use them too, in my experience they’re faster and slightly cheaper than Digital Ocean. Here’s a referral link that will get you $50 in credit).
That means I get to build my own Debian Vagrant box.
Building a Vagrant base box from Debian 9 “Stretch” isn’t hard, but most tutorials I found were outdated or relied on third-party tools like Packer. Why you’d want to install, setup and configure a tool like Packer to build one base box is a mystery to me. It’s far faster to do it yourself by hand (which is not to slag Packer, it is useful when you’re building an image from AWS or Digital Ocean or other provider).
Here’s my guide to building a Debian 9 “Stretch” Vagrant Box.
Create a Debian 9 Virtual Machine in Virtualbox
We’re going to use Virtualbox as our Vagrant provider because, while I prefer qemu for its speed, I run into more compatibility issues with qemu. Virtualbox seems to work everywhere.
First install Virtualbox, either by downloading an image or, preferably, using your package manager/app store. We’ll also need the latest version of Debian 9’s netinst CD image, which you can grab from the Debian project (scroll to the bottom of that page for the actual downloads).
Once you’ve got a Debian CD, fire up Virtualbox and create a new virtual machine. In the screenshot below I’ve selected Expert Mode so I can go ahead and up the RAM (in the screenshot version I went with 1GB).
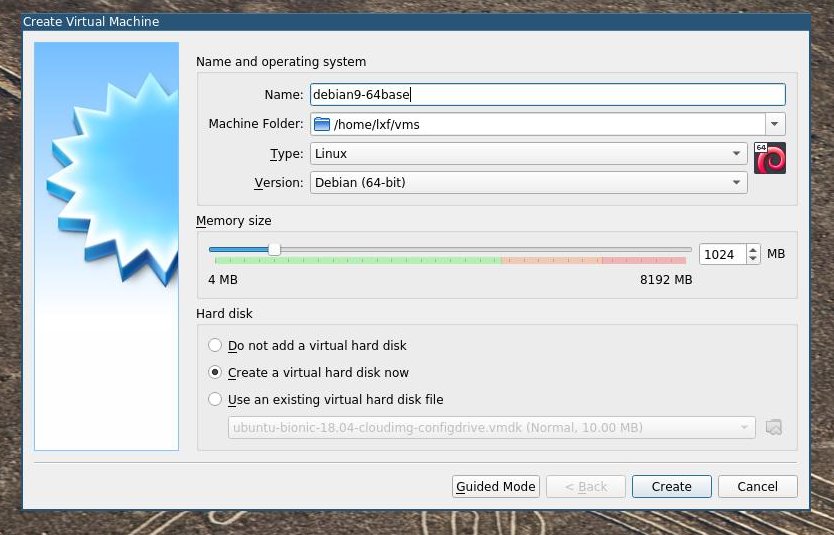
Click “Create” and Virtualbox will ask you about the hard drive, I stick with the default type, but bump the size to 40GB, which matches the VPS instances I use.

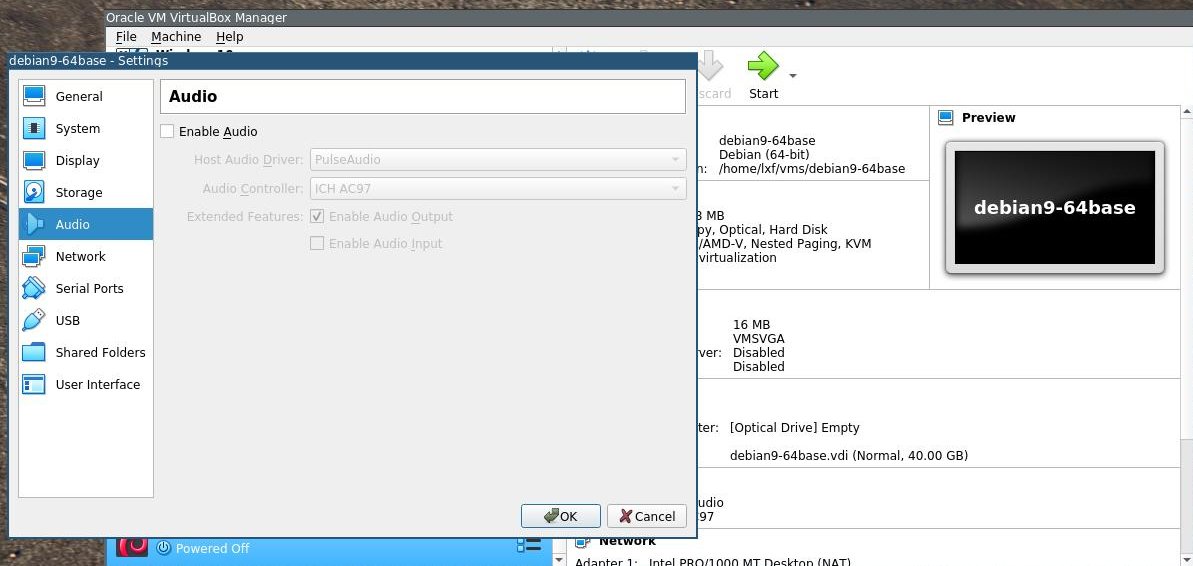
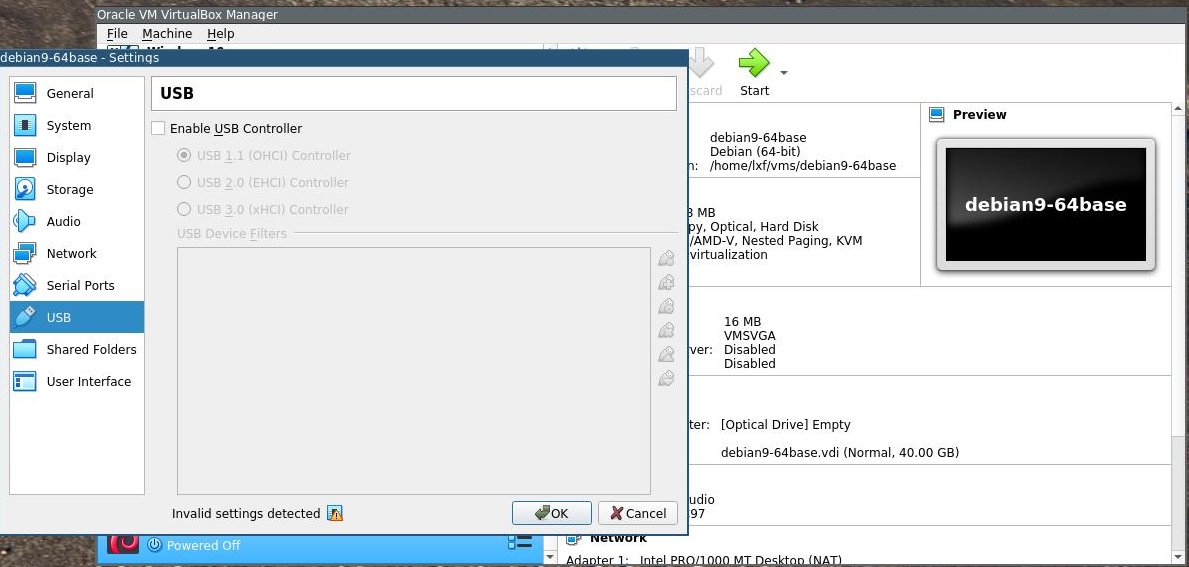
Click “Create” and then go to the main Virtualbox screen, select your new machine and click “Settings”. Head to the audio tab and uncheck the Enable Audio option. Next go to the USB tab and disable USB.
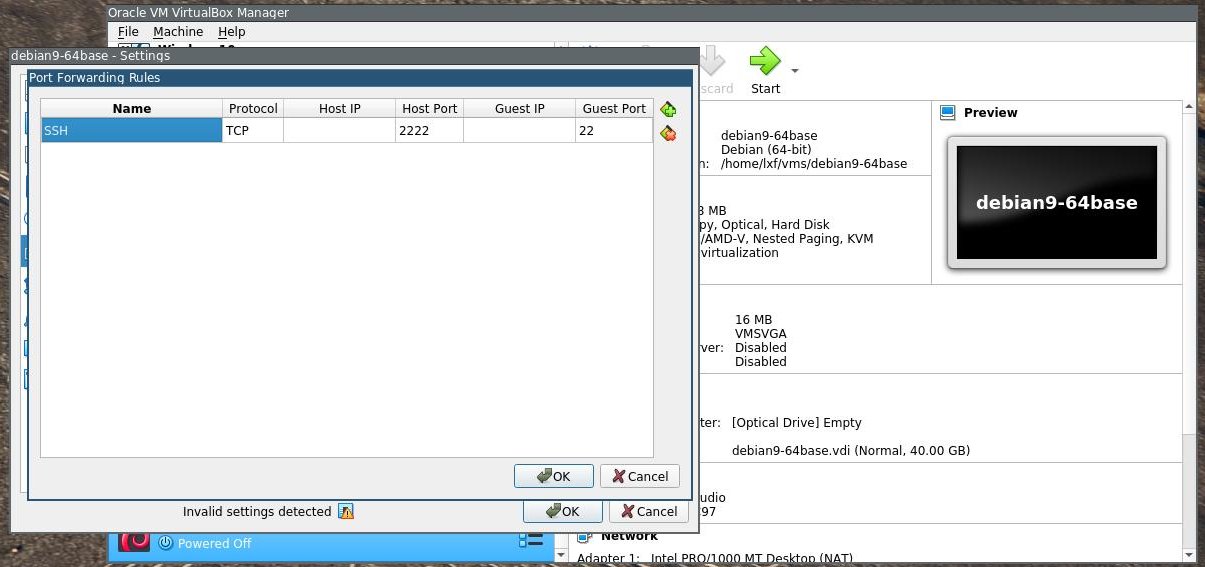
Now click the network tab and make sure Network Adapter 1 is set to NAT. Click the “Advanced” arrow and then click the button that says Port Forwarding. Add a port forwarding rule. I call mine SSH, but the name isn’t important. The important part is that the protocol is TCP, the Host and Guest IP address fields are blank, the Host port is 2222, the Guest port is 22.
Hit okay to save your changes on both of those screens and now we’re ready to boot Debian.
Install Debian
To get Debian installed first click the start button for your new VM and Virtualbox will boot it up and ask you for the install CD. Navigate to wherever you saved the Debian netinst CD we downloaded earlier and select that.
That should boot you to the Debian install screen. The most important thing here is to make sure you choose the second option, “Install”, rather than “Graphical Install”. Since we disabled USB, we won’t have access to the mouse and the Debian graphical installer won’t work. Stick with plain “Install”.

From here it’s just a standard Debian install. Select the appropriate language, keyboard layout, hostname (doesn’t matter), and network name (also doesn’t matter). Set the root password to something you’ll remember. Debian will then ask you to create a user. Create a user named “vagrant” (I used “vagrant” for the fullname and username) and set the password to “vagrant”.
Tip: to select (or unselect) a check box in the Debian installer, hit the space bar.
Then Debian will get the network time, ask what timezone you’re in and start setting up the disk. I go with the defaults all the way through. Next Debian will install the base system, which takes a minute or two.
Since we’re using the netinst CD, Debian will ask if we want to insert any other CDs (no), and then it will ask you to choose which mirrors to download packages from. I went with the defaults. Debian will then install Linux, udev and some other basic components. At some point it will ask if you want to participate in the Debian package survey. I always go with no because I feel like a virtual machine might skew the results in unhelpful ways, but I don’t know, maybe I’m wrong on that.
After that you can install your software. For now I uncheck everything except standard system utils (remember, you can select and unselect items by hitting the space bar). Debian will then go off and install everything, ask if you want to install Grub (you do — select your virtual disk as the location for grub), and congratulations, you’re done installing Debian.
Now let’s build a Debian 9 base box for Vagrant.
Set up Debian 9 Vagrant base box
Since we’ve gone to the trouble of building our own Debian 9 base box, we may as well customize it.
The first thing to do after you boot into the new system is to install sudo and set up our vagrant user as a passwordless superuser. Login to your new virtual machine as the root user and install sudo. You may as well add ssh while you’re at it:
apt install sudo ssh
Now we need to add our vagrant user to the sudoers list. To do that we need to create and edit the file:
visudo -f /etc/sudoers.d/vagrant
That will open a new file where you can add this line:
vagrant ALL=(ALL) NOPASSWD:ALL
Hit control-x, then “y” and return to save the file and exit nano. Now logout of the root account by typing exit and login as the vagrant user. Double check that you can run commands with sudo without a password by typing sudo ls /etc/ or similar. If you didn’t get asked for a password then everything is working.
Now we can install the vagrant insecure SSH key. Vagrant sends commands from the host machine over SSH using what the Vagrant project calls an insecure key, which is so called because everyone has it. We could in theory, all hack each other’s Vagrant boxes. If this concerns you, it’s not that complicated to set up your own more secure key, but I suggest doing that in your Vagrant instance, not the base box. For the base box, use the insecure key.
Make sure you’re logged in as the vagrant user and then use these commands to set up the insecure SSH key:
mkdir ~/.ssh
chmod 0700 ~/.ssh
wget https://raw.github.com/mitchellh/vagrant/master/keys/vagrant.pub -O ~/.ssh/authorized_keys
chmod 0600 ~/.ssh/authorized_keys
chown -R vagrant ~/.ssh
Confirm that the key is in fact in the authorized_keys file by typing cat ~/.ssh/authorized_keys, which should print out the key for you. Now we need to set up SSH to allow our vagrant user to sign in:
sudo nano /etc/ssh/sshd_config
Uncomment the line AuthorizedKeysFile ~/.ssh/authorized_keys ~/.ssh/authorized_keys2 and hit control-x, y and enter to save the file. Now restart SSH with this command:
sudo systemctl restart ssh
Install Virtualbox Guest Additions
The Virtualbox Guest Addition allows for nice extras like shared folders, as well as a performance boost. Since the VB Guest Additions require a compiler, and Linux header files, let’s first get the prerequisites installed:
sudo apt install gcc build-essential linux-headers-amd64
Now head to the VirtualBox window menu and click the “Devices” option and choose “Insert Guest Additions CD Image” (note that you should download the latest version if Virtualbox asks1). That will insert an ISO of the Guest Additions into our virtual machine’s CDROM drive. We just need to mount it and run the Guest Additions Installer:
sudo mount /dev/cdrom /mnt
cd /mnt
sudo ./VBoxLinuxAdditions.run
Assuming that finishes without error, you’re done. Congratulations. Now you can add any extras you want your Debian 9 Vagrant base box to include. I primarily build things in Python with Django and Postgresql, so I always install packages like postgresql, python3-dev, python3-pip, virtualenv, and some other software I can’t live without. Also edit the .bashrc file to create some aliases and helper scripts. Whatever you want all your future Vagrant boxes to have, now is the time to install it.
Packaging your Debian 9 Vagrant Box
Before we package the box, we’re going to zero out the drive to save a little space when we compress it down the road. Here’s the commands to zero it out:
sudo dd if=/dev/zero of=/zeroed bs=1M
sudo rm -f /zeroed
Once that’s done we can package up our box with this command:
vagrant package --base debian9-64base
==> debian9-64base: Attempting graceful shutdown of VM...
==> debian9-64base: Clearing any previously set forwarded ports...
==> debian9-64base: Exporting VM...
==> debian9-64base: Compressing package to: /home/lxf/vms/package.box
As you can see from the output, I keep my Vagrant boxes in a folder call vms, you can put yours wherever you like. Wherever you decide to keep it, move it there now and cd into that folder so you can add the box. Sticking the vms folder I use, the commands would look like this:
cd vms
vagrant box add debian9-64 package.box
Now when you want to create a new vagrant box from this base box, all you need to do is add this to your Vagrantfile:
Vagrant.configure("2") do |config|
  config.vm.box = "debian9-64"
end
Then you start up the box as you always would:
vagrant up
vagrant ssh
Shoulders stood upon
- Vagrant docs
- Engineyard’s guide to Ubuntu
- Customizing an existing box - Good for when you don’t need more RAM/disk space, just some software pre-installed.
-
On Arch, using Virtualbox 6.x I have had problems downloading the Guest Additions. Instead I’ve been using the package
virtualbox-guest-iso. Note that after you install that, you’ll need to reboot to get Virtualbox to find it. ↩
Thoughts?
Please leave a reply:
All comments are moderated, so you won’t see it right away. And please remember Kurt Vonnegut's rule: “god damn it, you’ve got to be kind.” You can use Markdown or HTML to format your comments. The allowed tags are
<b>, <i>, <em>, <strong>, <a>. To create a new paragraph hit return twice.